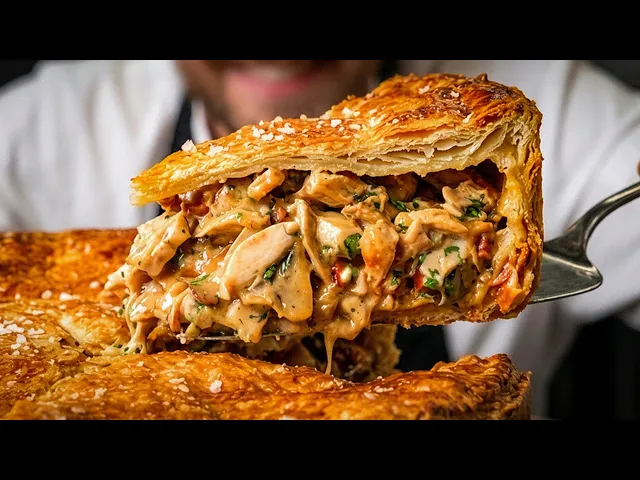
The Best Chicken Pie You’ll Ever Make
Fallow
0:00 There aren't many things as comforting as a chicken pie,
0:03 but too often the chicken is dry and the sauce only tastes of cream.
0:06 We're here to show you with a few chef techniques how
0:08 you can take the humble chicken pie to a whole new level.
0:11 I was reading Clarity's cookbook the other day and they've
0:13 got an amazing recipe for a chicken pot pie,
0:15 a casserole with a lid on, give or take.
0:18 But we're going to be taking the inspiration from their recipe and applying
0:20 it and putting it into a fully lined chicken pie with shopboard pastry.
0:26 So you can definitely achieve this one at home.
0:28 To cook this chicken, we're going to spatchcock it.
0:30 So, we're going to flip him over and taking a sharp pair of scissors.
0:33 We're going to hold the parson's nose, which is this little sticky bit out here.
0:36 We're going to hold that in front of us and we're going to take some scissors
0:39 and we're going to snip down either side
0:41 of that coming out down to where the wings are.
0:43 So, the reason we're going to spatchcock it is to flatten out the chicken.
0:47 It's going to decrease the cooking time.
0:49 Also, it means that the legs, which take longer to cook than the breast,
0:52 are going to be almost like raised up slightly,
0:54 meaning the leaner breasts are going to be slightly covered
0:57 throughout the cooking process and potentially stop them from drying out.
0:59 Effectively, the spinal column with the parson's nose there.
1:01 We're going to chuck that onto the tray to roast as well.
1:03 And effective, you got your chicken here with the wings.
1:06 And what we're going to do is we're going to flip that back over.
1:08 And then we're just going to press that down.
1:09 You're going to leave all this skin and sort of stuff attached.
1:11 Just wrap that around the breast.
1:12 Pop that onto a tray.
1:13 Give them a good season and pop it into roast.
1:15 We're going to pop that into the oven 190.
1:17 We'll check it after about 30 minutes.
1:19 Okay.
1:19 So, once your chicken is fully roasted, should look a lot like this.
1:22 So, what we're going to do firstly is I'm going to pour off the chicken fat.
1:25 Now, this is super important.
1:26 We're going to save this for later.
1:28 We're going to use this chicken fat as a way to thicken our finished sauce.
1:32 The original recipe that we found for this dish, as I mentioned earlier,
1:34 the Clarages recipe, it utilized only really the breast in the actual pie.
1:39 And then it used all of the thighs and the drumsticks purely to make the sauce,
1:43 which we thought was a bit of a waste.
1:45 And especially when talking about doing this recipe at home,
1:47 we wanted to tweak and make sure the recipe was
1:49 as cost effective as possible for when you're making it at home,
1:51 but also super super delicious.
1:53 Very similar to how you just carve a normal chicken.
1:55 If your chicken is slightly under or on the pinker side,
1:58 that's absolutely fine because this pie is going to get fully cooked.
2:00 Again, just like you're having a Sunday roast chicken,
2:02 you can really get in there and remove all of the get all
2:05 of that meat off the bone and then
2:07 all these sort of bones and connective tissue.
2:10 Save all of that cuz we're going to use all of that to enrich our sauce.
2:14 I'm actually going to remove the skin.
2:16 I'm just going to dice that up as well.
2:18 And that's going to go in with our bones just
2:20 cuz the skin can get a bit flabby once it's,
2:22 you know, obviously submerged in the sauce.
2:24 But I'm just going to take our breast
2:25 and just just dice this up into nice large chunks.
2:28 You could do this recipe with a just a boughtin rotisserie
2:31 chicken like one of the ones you just get from the supermarket.
2:33 So I've just diced up my breast there plus
2:35 the the few bits I've scraped from the carcass.
2:37 Going to place that into a container.
2:39 I'm just going to do exactly the same process with the legs.
2:41 We want to ideally have it like as chopped
2:43 as you can rather than like completely shredded.
2:45 So when you try and remove it off the bone and as large a chunk as you can.
2:49 Okay.
2:49 So all my meat is then diced up and place that all into my container.
2:53 That's ready to fill our pie later.
2:55 So as you can see, one of the benefits
2:56 of buying a whole chicken is you get all of this.
2:58 So then I'm just going to break up the rest of those bones.
3:01 Increase the surface area as much as possible.
3:03 Spread it out nicely.
3:04 And I'm just going to give that put that back in the oven
3:06 for another sort of 15- 20 minutes just to get as dark as possible.
3:09 So now we've got our chicken prepped, we've got our bones working.
3:12 Now we're going to start the main body of the pie.
3:14 So what we're going to make here is an enriched chicken sauce or a sauce suprem.
3:19 So it's a really classic French sauce, one of, you know,
3:21 based off a foundational mother sauces which we know you guys love.
3:26 So I'm going to take a large pan, put on a low heat,
3:29 going to add a little touch of oil and a couple of knobs of butter.
3:31 And I'm going to take some banana shellots.
3:33 And these schlots are going to add a lovely sweetness to our sauce.
3:36 And this is we're just going to sweat these off
3:38 in the butter sort of on a medium high heat.
3:41 Um and then we're going to caramelize in the pan.
3:44 Really sort of developing that natural umami flavor.
3:47 So Claraj is one of the main sort of five-star hotels in London.
3:51 Very synonymous with um you know with fine dining and very high quality food.
3:57 Been on their sort of on their main hotel
3:59 menu for for for for years and years and years.
4:02 So schlots in this nice pan.
4:04 Touch of salt as always.
4:05 is you want to make sure you're seasoning throughout the cooking process,
4:08 not just at the end.
4:08 And I'm just going to let this sort of caramelize down on a medium low heat.
4:12 So, here's my chicken bones I've just re-roasted on, but you're
4:15 literally just getting free flavor by buying a whole chicken.
4:18 Cannot describe to you how much more beneficial it is.
4:20 That's going to make our sauce and our pie filling so much more flavorful.
4:23 We've got all that chicken fat free,
4:24 which you don't necessarily need to use all for this recipe.
4:27 You can save that, put it on your roast potatoes.
4:29 You can use it to cook vegetables in.
4:31 It's just again just another really useful product.
4:33 To my schlots, I'm going to add in a crushed garlic,
4:35 some rosemary and some thyme and a cheeky bay leaf.
4:39 Give that a little sweat.
4:40 Just get those aromomas going.
4:41 Some white wine.
4:42 Delaze the bottom of the pan.
4:44 You know the deal by now.
4:44 And then reduce that by at least half.
4:47 Once the wine's reduced, then we're going to go in with some stock.
4:49 Then we're going to go in with our roasted chicken bones.
4:52 So, basically making it, we like to call this an enriched stock.
4:55 But most supermarkets you can get stock now,
4:56 but if you didn't want to and you only had stock cubes, that's absolutely fine.
4:59 Just dilute the stock cube.
5:00 The only difference I would say don't add
5:02 any seasoning to the sauce or the stock filling
5:05 until the end just cuz these stock cubes can
5:07 carry a little bit of extra salt in them.
5:09 So you wouldn't want to add all your salt into your vegetables
5:11 and then add your stock cube and have it too salty.
5:13 Bones go in.
5:13 The only the only extra step I'm going to do here is once this stock is boiling,
5:17 I'm going to put some of the stock onto
5:18 this tray to remove all of that flavor off the bottom.
5:20 You can see how dark that water is that's gone in there now.
5:23 So it's lovely.
5:23 And just scrape that into your stock.
5:25 This will probably reduce by at least half.
5:27 Basically, we're going to reduce it to get the right flavor.
5:29 Once we've got the flavor we're after, we're then going to thicken it later.
5:32 So, while my sauce is reducing,
5:34 we're going to get on with the garnish for the pie.
5:36 Smoked bacon, button mushrooms, and then some more shellot.
5:39 So, with the schlots, I'm just going to cut them nice and chunky,
5:41 sort of half cm slices.
5:43 We always like to cook the garnish separate to the filling.
5:46 Sort of in traditional methods,
5:47 you quite often roast off your garnish and cook it in with the pie mix.
5:51 But by cooking it separately, we can really maximize the flavor of each
5:55 of our garnishes and also most importantly, the texture.
5:57 So, just going to take our mushrooms out.
5:59 We're going to quarter.
5:59 Some of these we're going to cut into quarters,
6:01 some of them into halves, depending on the size.
6:02 And we're going to roast all of this garnish
6:05 in more of that reserved chicken fat.
6:07 Tiny bit of oil in the pan.
6:08 And the first thing we're going to go in with is the smoked bacon.
6:11 I'm just going to sweat that bacon off on a nice low heat.
6:14 So, while the garnish is going, I'm just going to finally chop some nice herbs.
6:17 So, here I've got some taggon and some parsley.
6:19 We're not going to put these into the sauce cuz we want
6:21 the to retain the freshness on these herbs as much as possible.
6:24 So, I'm just doing the just chopping this up.
6:26 Getting ahead now.
6:26 Going to add that into my chicken.
6:28 The bacon's nearly there now.
6:30 And get the last little crispiness on that sauce is almost ready.
6:32 The sauce was cooking for about 30 35 minutes.
6:35 What I'm going to do now is I'm going to add some cream into this stock.
6:38 Bring it together before I pass it.
6:40 Basically enriching with cream is what the sauce suprem mean.
6:43 So it's going to add the cream, bring that back to the boil,
6:45 simmer it for a couple of minutes, and then pass it off.
6:47 So now my bacon's cooked.
6:48 I'm just going to put the pan on a slight
6:50 angle cuz I want to leave that fat in the pan.
6:52 We're going to use that fat to color off our shellots and our mushrooms.
6:55 Okay.
6:55 And then I'm going to go in my schlots
6:56 with a little bit of the chicken fat as well.
6:58 Okay.
6:58 So once our sch slots are getting a little bit
7:00 of color on, we're next going to go in with the mushrooms,
7:02 little bit of chicken fat.
7:03 So all these little points we're adding in here,
7:05 the reduction of the of the chicken stock,
7:07 the roasting of the bones, the caramelizing of the veg separately,
7:10 all these little points are really going to all elevate going
7:13 to come together beautifully at the end to really elevate this pie.
7:15 So we're going to pass off the sauce now.
7:17 So once your sauce is passing off,
7:19 we're just going to let this sort of drain for 5 10 minutes.
7:21 really let all of those juices come out and just
7:24 gently push through with the back of your spoon.
7:26 Sauce back into our pan.
7:27 So, the next stage, our garnish is pretty much ready now.
7:30 Like, you just know that's going to taste good.
7:32 Look at the state of that.
7:33 So, we're going to take that.
7:34 We're going to put the sauce back on.
7:35 And then we're just going to keep reducing it until we got that finished flavor.
7:39 Two secret ingredients.
7:40 One, not so secret, pretty standard.
7:42 Dijon mustard.
7:43 Dijon mustard and chicken.
7:45 Perfect combination.
7:46 Marriage made in heaven.
7:48 Second one, bit of a curveball.
7:49 Like it or love it, Marmite.
7:51 Bear with me.
7:51 You don't want to taste Marmite.
7:53 It's purely there for that like savory umami hit.
7:56 It's just going to add depth and richness to our finished sauce.
7:59 If you haven't tried cooking with Marmite before, highly recommend it.
8:02 It's like a secret little store
8:03 cupboard essential that can really elevate things.
8:05 If you don't have Marmite, you can get Veggie Mite in Australia.
8:08 Bob also works fine or yeast extract.
8:10 And what it is is all the glutamates within the yeast that develop
8:13 on the palette and give you this amazing amazing richness and funk to the sauce.
8:17 Oh, so good.
8:17 Touch more salt.
8:18 And then I'm going to take some of that sauce
8:21 and then add it to the mustard creating a slurry.
8:24 Just going to help the mustard dissolve into the sauce.
8:26 That marmite also adds a lovely color to the sauce.
8:29 Flavor's good.
8:30 Lovely acidity from the mustard.
8:31 Going to give that another couple of minutes to reduce.
8:33 Uh the way we're going to thicken it called a bur manet.
8:35 You might have seen us make this before,
8:37 which is effectively where you mix flour usually with butter.
8:40 In this recipe, we're going to use
8:41 the chicken fat instead of butter for more flavor.
8:44 So, what I've got here is the flour,
8:45 and I'm just going to add the chicken fat to the flour and make a nice paste.
8:49 Usually about equal quantities to the flour and just mix it into a nice paste.
8:52 That paste will then be able to let
8:54 the flour dissolve into that sauce without getting any lumps.
8:57 So, there we go.
8:57 You got a lovely chicken fat bur mane there, which we'll use.
9:01 So, I'm now going to turn my heat down super low and I'm
9:03 going to go in with a spoon of our chicken fat burman.
9:06 And I'm just going to whisk that in on a low heat
9:08 and the sauce should thicken as if by magic in front of your eyes.
9:12 Now at this stage you want to have it
9:13 on nice and low so the sauce doesn't catch.
9:15 You can already see it thickening.
9:16 It should almost be pretty much instantaneous with the burman.
9:19 Probably get the full effect of it after say maybe a minute or two.
9:22 Now a touch of fresh lemon juice.
9:24 Heat off.
9:24 And I'm just going to give this a final taste.
9:27 My work here is done.
9:29 Give that a minute to cook out.
9:30 Okay.
9:30 Garnish is going to go in.
9:32 And the chicken.
9:33 It might be a bit thick now.
9:34 There's still a lot of moisture left in the chicken and the vegetables itself.
9:37 So once that's cooking inside the pie,
9:38 it's going to release a little bit of water as well.
9:40 Going to chuck it in the fridge just to cool down while we get the pie ready.
9:43 It's always a bit easier to make the pie
9:44 when the filling is not piping packing hot.
9:47 And you thought I'd forgotten, but I wouldn't leave you high and dry.
9:49 I wouldn't do that to you guys.
9:51 Sort of man would I be if I created a video without a cartoon?
9:54 While our product is cooling down to avoid getting a skin.
9:57 So, there you go.
9:59 Now, for the pastry,
10:00 we've got two different types today just to show you how to prepare both.
10:03 So, this is a pre-bought a block of puff pastry.
10:06 Comes like this.
10:06 And then for the lid, we're going to be using a pre-bought puff pastry,
10:09 but a sheet of puff pastry.
10:11 I'm just going to flour my bench slightly.
10:12 Obviously, this is the ring mold that I'm going to be using.
10:15 So, it's a classic sort of cake tin.
10:16 What's that?
10:17 Sort of 9 in sort of a few inches high as well.
10:19 So, I need enough pastry to sort of cover that whole rim.
10:22 So, I'm going to need a big old block.
10:23 So, we're going to start by rolling out this sheet of puff pastry.
10:25 So, what we're going to do is a technique called riging.
10:27 Basically, where we're going to push down on the pastry
10:30 in equal pressure across it for the first stage of the rolling.
10:33 And I'm just going to turn it 90° and then do the same.
10:35 And effectively your pastry is growing in surface area,
10:38 but we're not overworking the proteins in the flour just
10:41 for the sort of the first half of the rolling.
10:43 You could use large sheets of puff
10:45 pastry instead of having to do this technique.
10:47 That's absolutely fine.
10:48 So, a little bit of flour.
10:49 Now, I've got a nice large surface area.
10:51 Now, I'm going to roll it nice and quickly to the shape that's required.
10:54 So, whenever you're rolling pastry,
10:55 you want to make sure that you're rolling towards you
10:57 and away from you rather than from side to side.
10:58 So, we're looking for sort of couple of millm thick.
11:01 I'm going to put my my mold on the on here.
11:03 I'm just going to cut around it.
11:05 giving myself at least that that amount of depth plus a bit extra.
11:08 So, I'm going to go nice and large.
11:10 Any extra space pastry you can obviously always save for decoration.
11:12 So, I'm just going to place the pastry onto the back
11:14 of my hand and just lower it into the mold.
11:16 Try not to use your fingers too much and use like more
11:18 the palm of your hand so you don't potentially tear the pastry.
11:21 Lift up the pastry with one hand and then with the back of your hand,
11:23 just push that pastry into the corners of the pie
11:25 mold or tart case or whatever you're using.
11:27 And obviously, eventually you'll have a a lip
11:29 where the pastry sort of doubles up.
11:31 And at that stage, that's when you want
11:32 to just use your thumb and forefinger and just push
11:35 the pastry against the side and get it to be
11:37 the same thickness as the pastry you've rolled out.
11:39 You just want to go all the way around.
11:40 Once you've got it roughly in, you can then go around in a bit more detail.
11:43 You trim off a little bit of extra pastry
11:45 just to make it a bit easier for yourself.
11:46 Then you can now start to make the shape a bit more detail.
11:49 So you're going to go around, push into the corner,
11:50 and then push against the side of the mold.
11:52 And just do that all the way around.
11:53 So you're sort of going pushing down into the bottom
11:55 and then pushing flat against the side of the mold.
11:57 And then where you got the layers here where the where the pastry is doubled up,
12:00 then you want to make sure you're really pushing it to get it nice and even.
12:03 You don't want any any massive bits of pastry,
12:05 but it's not going to cook evenly.
12:06 Probably want to go around at least two times, I would say.
12:08 Making sure not to push down too far so that you get any breakages,
12:12 obviously, cuz obviously all the sauce will then leech out.
12:14 And now we're going to pop that in the fridge to set before we add the filling.
12:16 So, my pastry case has just been uh been
12:18 chilling for a little bit just to firm up nicely.
12:20 So, the next thing we're going to do is going to make get our lid ready.
12:23 So then I'm going to take one sheet
12:24 piece of pre-bought pastry and then just cut around.
12:28 Pop that in the fridge just to chill.
12:30 And we're going to bring out our filling.
12:33 So our filling is sort of like set nicely.
12:35 Sort of just coming down to fridge temperature now.
12:37 So the reason we're chilling this down is we want the puff
12:39 pastry to start rising before there's too much steam coming off the filling.
12:43 If I was to put this in hot or even like slightly warm,
12:45 uh the the the steam would start to cook
12:48 the pastry from the bottom, make it soggy.
12:50 We want the pastry to start rising before the filling starts getting hot.
12:53 So, I'm going to got my lid back out.
12:55 So, I'm going to take a little bit of egg wash.
12:56 Just go around the tops of the pie.
12:58 We want a bit of a gap on this pie.
13:00 We want to make sure the pastry rises as much as possible on this pie.
13:03 So, I'm going to egg wash the bottom
13:04 of this pastry lid as well, just help it stick.
13:07 So, then we're going to lift up our pastry lid, place it on top,
13:10 and then we're going to go around and just crimp the two pastries together.
13:13 Do a couple of stages.
13:14 First of all, we're just going to press it together.
13:16 You got a nice bit of overhang.
13:17 So, this stage is super easy.
13:18 Once we've got rid of the extra, we're then just going to use a fork and just
13:21 go around and crimp the edges nice and hard.
13:23 Just going for a very, nothing fancy with the presentation,
13:26 just a nice classic, something that's easy for you to achieve at home.
13:29 But this is just going to go and make
13:30 sure all those edges are really well sealed.
13:32 Any last little bits to tidy up, just nick those off with a sharp knife.
13:35 So then we're just going to glaze our pie all over,
13:37 nice and generous with the egg wash.
13:39 And then most importantly, we're going to put a little a couple of air holes,
13:42 a couple of slits in the top of the pastry,
13:44 just so some of the steam can escape.
13:46 We're really after maximum volume.
13:48 Nice bit of crunchy sea salt all over the top.
13:50 So, we're going into the oven 220, 10 minutes,
13:52 and we're going to drop it to 180 for another 30 minutes.
13:54 This been in the oven now for 40 minutes in total.
13:59 Pop the hood.
14:00 Barker, man.
14:02 Flavor overload, dude.
14:03 The filling, as we knew, we put so much effort into it.
14:06 With that puff pastry casing, you get the best of both worlds.
14:10 You get the perfect sauce, perfect mix of the meat,
14:12 and you've got a lovely casing on the outside and on the top,
14:14 which is always an added bonus.
14:16 A dish riddled with history from one of the most iconic hotels
14:20 in all of the UK and super achievable to do at home.
14:25 Highly, highly recommend you give this one a go.
14:28 Your guests and your family will not be disappointed.