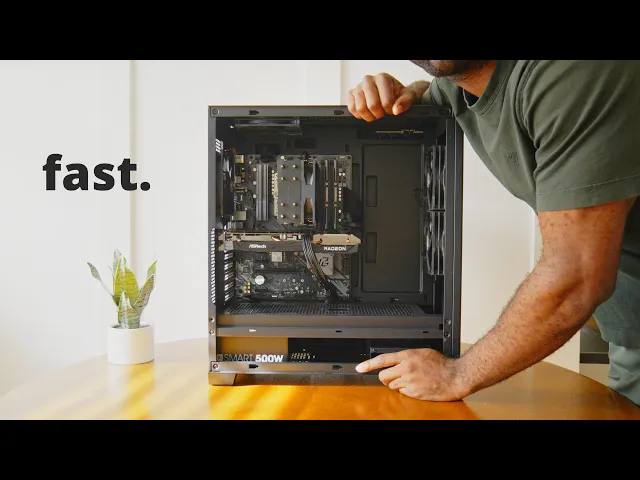
A calming $500 PC build to fight anxiety 🤍
OzTalksHW
0:00 for the price of a regular PS5 I built a gaming
0:03 computer that can play any game at 1080p is easy
0:06 to build and is very upgradeable so if this is something
0:09 that sounds cool to you then keep watching cuz I'll show you
0:12 exactly how to build it and if you like the audio
0:15 in this video then you should check out the sponsor antline
0:19 who made the mod mic the microphone that I've been using
0:22 for the past year they're having a Black Friday sale where you
0:25 can actually get it on discount more on that later though
0:29 let's uh talk about this computer the processor I chose is
0:33 the ryzen 53600 for about $56 on AliExpress it's six cores
0:38 and 12 threads it has a moderate frequency and it even
0:42 supports pcie Gen 4 something that even the newer ryzen 55500
0:47 doesn't do now we have a few options to call the ryzen
0:50 53600 and the most obvious one is the stock cooler
0:54 The Wraith stealth that you can buy for about $12 to $13
0:58 on Amazon this will definitely get the job done but for only
1:02 a few dollars more you can get the thermalite Assassin
1:05 which is going to be miles ahead of the r stealth
1:08 and we'll talk about that a little bit later even though
1:11 ddr4 Ram is so cheap nowadays I still recommend a 16
1:15 GB kit because it will get the job done it's only
1:18 about $27 for a moderately fast unit usually I buy 500
1:24 GB ssds for my budget computers but I decided to up
1:28 the an21 terab and I think it's completely worth it I
1:31 picked up the Silicon power a60 PCI SSD for $48 but if
1:37 I'm being completely honest with you any pcie SSD will work
1:41 fine for this budget and you probably won't notice a difference
1:45 and as a general rule of thumb get the most storage
1:48 that you can afford our motherboard is the azero b550 Phantom
1:52 gaming 4 it has Wii and Bluetooth built-in supports pcie 4.0
1:57 and supports any x3d chip for fure upgrades and it looks kind
2:02 of nice as well I bought it for $90 on New
2:05 Egg now the GPU is probably everyone's favorite part and makes
2:09 sense it's the most important component in the computer and here
2:12 I chose the RX 6600 and you can buy it for about
2:16 $160 secondhand on eBay it's one of the best value products
2:20 out there right now it's only one generation old at this point
2:24 it has 8 gigs of vram it's power efficient and it
2:27 works great for 1080p gaming now we're at the the CPU
2:30 Cooler that I actually recommend and it's the thermalite Assassin x120
2:35 refined SE this is going to cool the ryzen 5 way
2:38 better than The Wraith stealth and I have no problem using
2:42 it even for a ryzen 7 in the future and it's
2:45 only about $18 for the power supply I chose the tried
2:49 and true thermal Tak smart 500 watt unit you can also
2:53 buy the MSI mag 550 or 650 if you want something
2:57 a little higher quality but if you're really tied of money
3:00 this power supply will serve you well I've used it
3:02 in probably half a dozen builds and I haven't had any issues
3:07 and everything will be stored in the fantex XT Pro it's
3:11 about $50 to $60 it's an ATX case so it supports
3:15 fulls sizee ATX motherboards and it's one of the highest rated
3:18 cases out there it's wellb built it looks great it has
3:22 great air flow and lots of space so it's forgiving for new
3:25 Builders it's just a solid option overall now because our case
3:30 only has one fan pre-installed I picked up three 120
3:35 mm fans for about $9 no RGB No Frills just plastic
3:40 that blows air and that's kind of it and honestly that's
3:43 just what we need it's not technically necessary but it will keep
3:47 your computer components cool so I recommend it now this part
3:50 is completely optional but if you want to add a little bit
3:53 of personality and have some fun with your build then totally
3:56 do it and that's colored cable extensions I chose black to stick
4:00 with the dark color scheme but you can choose red
4:02 blue green basically anything you want and this is purely aesthetic
4:06 and the very last thing here is just a Fan Hub
4:09 to control all of our fans it's about $5 on Amazon
4:13 and it allows us to control up to four different fans
4:16 on one fan header super important and super convenient so I
4:21 recommend it so that's our entire build it's going to be
4:24 between $480 and $520 depending on prices availability and if you go
4:30 with any of the optional aesthetic upgrades so we're going
4:37 to start out with the motherboard and I recommend taking out
4:40 the antenna and the io shield and then the tiny screw
4:44 that will screw in the m.2 SSD next we're going to install
4:55 the RAM and it's pretty straightforward you're going to pull back
4:58 the clips on the ram slots you're going to line up
5:01 the notches on the ram slots with the ram itself and then
5:05 push on both ends until you hear a satisfying click and next
5:16 up we have our SSD this is pretty similar to The Ram
5:21 you're going to line up the notch on the SSD
5:23 with the notch on the SSD slot and then you're going
5:26 to use that tiny screw I mentioned before to to screw
5:30 it into place easy now we're going to install the CPU
5:52 but we're going to prep the motherboard for the CPU Cooler
5:55 first and here it is the ryen 53600 the gift that keeps
6:10 on giving before we take the CPU out of the CPU
6:21 protection plastic thingy we're going to pull up the lever now
6:30 the CPU should fall right into place you shouldn't need any
6:33 pressure and once it's in place you can pull the lever
6:36 down and this is the orientation now I'm going to use
6:46 the thermo ride assassin CPU Cooler but in case you didn't
6:49 purchase that I'll show you how to install The Wraith stealth thermop
6:53 paste is already pre-applied on the bottom so you don't need
6:56 to do that you're going to line up The Wraith stealth screws
7:04 with the screw holes on the motherboard back plate and then
7:07 just screw in an x-like pattern oh and hot tip you
7:11 see that little AMD logo that's jutting out the side
7:14 of the CPU Cooler make sure it's not touching the ram slots otherwise
7:18 you might block whatever your slots after that you just plug
7:23 in the CPU fan header and you're done but now we're
7:29 going to install saw the thermalite Assassin now it's pretty difficult
7:33 to explain this with a voiceover it does come with a manual
7:37 and I recommend following that and then you can use
7:40 this video as a guideline if you need any help oh
8:15 and don't forget to take off the plastic covering now this does
8:20 come with thermal paste so just apply about a p size
8:23 drop onto the ryzen 5 CPU [Music] after screwing in the heat
8:42 sink we're going to clip the fan onto the heat
8:44 sink itself and then we'll plug the fan into the CPU
8:48 fan header [Music] [Music] cool so now we have everything installed
9:03 on the motherboard and now we can prep the case so
9:07 the first thing we're going to do is remove the case
9:09 side panels and then pull out this cardboard box that has
9:14 all of the case screws and cable management items next we're
9:35 going to install the motherboard IO Shield it's good to do
9:38 this now forgetting it and trying to do it later will
9:41 be a pain there aren't any screws for the io Shield
9:46 you just kind of have to pressure fit it into place so
10:04 after we do that I'm just checking to see where
10:07 the motherboard standoffs are and these raise the motherboard off the metal
10:11 back of the case so it doesn't get shorted there was
10:13 one standoff missing so I took a standoff out of my case
10:17 screw pack and screwed it in now I'm just routing some
10:21 cables before I actually place the motherboard in and screw it
10:25 into place now I'm not saying you should manhandle your motherboard
10:40 but these are pretty robust nowadays so after plugging in the front
10:49 panel header the USB 3 header and the HD audio header
10:53 I'm going to screw the motherboard into the standoffs and that should
10:56 secure it into place okay cool now it's time to install
11:11 the fans I'm going to remove the front panel and then
11:14 install two fans in the front which will be our intake
11:20 [Music] fans so here you want to make sure that there
11:27 isn't any logo facing you that way you know that it's
11:34 going to pull air into the case cool so now we're
12:05 done with the front intake fans and we're going to do
12:08 the same thing with the top of the case and add
12:11 an exhaust fan to pull air out so here you want
12:18 the logo of the fan to be facing towards you this way
12:23 you know that the air is going to be pulled out
12:25 of the case to the top nice so now we have
12:40 four total fans in the case and I'm going to use
12:42 that Fan Hub and plug them all in and now it's
12:58 finally time to install the power supply you want to install
13:09 the power supply with its fan facing down towards the ground
13:12 that way it can pull air into itself to cool itself
13:22 after the power supply is installed I'm going to plug in all
13:26 of our extension cables [Music] the extension cables we'll use would
13:35 be the motherboard 24 pin the CPU 8 Pin and the GPU
13:40 6+ 2 pin and here I'm just going to Route
13:56 the cables and then plug them in the GPU cable will
14:03 plug in a little bit later after we install the GPU
14:13 all right so now it's the fun part and this means
14:15 that we're almost done with the computer we're going to install
14:18 the video card the first thing I'll do is line up
14:25 the video card PCI Notch with the video card PCI slot
14:30 on the motherboard and that will tell me which IO brackets
14:33 on the side I need to remove so after removing those I'll
14:44 push down the lock on the pcie slot and then I'll
14:47 line up the notches and push it into place and to secure
14:54 the video card I'll just screw it in [Music] after
15:02 that we can plug in our cable extension to power
15:06 the video card and yeah that's pretty much it but before we
15:19 actually put the case side panel on let's uh turn it
15:22 on and see if it works are spinning yes so if
15:36 you're able to make it to the bio screen and all
15:38 the fans are turning then that means that your computer was successfully
15:41 built good job the final step here is to screw
15:46 in the antenna for the Wi-Fi module don't forget this because
15:50 your Wi-Fi will be terribly slow if you do so after
16:01 building your computer there are three things that you want to do
16:04 firstly enter the BIOS by spamming the delete key
16:07 on your keyboard after you turn on the PC then enable XMP
16:11 for your RAM this allows your RAM to actually run at its
16:14 rated speeds secondly install Windows 11 you'll need an 8 GB flash
16:19 drive but you can use the free unactivated version without any
16:23 issues I mean pretty sure I still do it and it's
16:27 been fine and lastly in install your GPU drivers Wi-Fi drivers
16:31 Bluetooth drivers and chipset drivers and after that you can install
16:35 your games and you're ready to go and if you want
16:37 the perfect microphone to play all of your games with your friends
16:41 check out ant Lion's mod mic they even have a special
16:44 running for Black Friday so you can get it at a cheaper
16:47 price I've used the wireless mod mic to voice almost all
16:49 of my videos the past year and it has been just
16:52 wonderful it turns out they actually have a wired USB version
16:56 and a wi 3.5 mm or auxiliary version available as well
17:01 all three versions of the mod mic attached to pretty much
17:04 any headphone out there as a matter of fact they attach
17:07 to non headphones too it's pretty cool and antline audio just
17:10 released the mod mic USB 2 for usba a and USBC
17:14 users and the mod mic uni 2 for their 3.5mm auxiliary
17:20 users these have improved microphone audio quality and a new mic
17:24 capsule so you don't have to switch between different speaking modes
17:27 anymore and both the USB 2 and uni2 work with practically
17:31 every device on the market that supports microphones so pick up
17:34 a mod mic now and if you buy during Black Friday
17:37 you can get 15% off all mod mics and their camir
17:41 as well link for that will be in the description and thank
17:43 you so much antline audio for sponsoring and for making
17:46 the mod mic it's done me good so far so let's talk
17:50 about gaming this PC offers what I would like to call
17:53 a very comfortable gaming experience even with harder to run titles
17:58 the p did a great job with Apex Legends using
18:01 a mix of medium and high settings at 1080p averaging around 160
18:06 FPS during a quick run hell divers 2 was harder to run
18:11 but still quite enjoyable using the high preset and Ultra quality
18:15 render option we stayed above 60 FPS the entire time basically
18:19 and it looked great while doing it Hogwarts Legacy hammers the entire
18:24 system pretty hard but the PC handled it well without any
18:28 upscaling we average 59 FPS with the high preset at 1080P
18:33 and that gives us some breathing room to tweak settings
18:35 to get to that 60 FPS experience New World tum a massively
18:40 multiplayer online RPG works great on this computer at high settings
18:46 using native 1080p we're averaging 67 FPS in the town centers
18:50 with players around once we're in open and simple PVE
18:54 combat the system averages around 87 FPS this gives me confidence
18:59 that it can handle large scale battles with some setting tweaks
19:02 OverWatch 2 was a complete breeze on the high preset and using
19:06 native 1080p we averaged almost 300 FPS and the PC barely
19:11 broke a sweat this won't be an issue at all for high
19:14 refresh rate gaming or Competitive Gaming Rainbow Six sieg was more
19:19 or less the same using the very high preset we averaged
19:23 253 FPS with a 1% low of 191 this computer
19:28 is a great great option for competitive play here cyberpunk 2077
19:33 Heats things up a little bit but the computer still handles
19:36 everything pretty well it averaged 90 FPS using the in-game Benchmark
19:41 on the high preset now this isn't native 1080p but with quality
19:45 FSR on but it still does a great job because
19:47 the image looks sharp now the hardest of the bunch and honestly
19:52 the biggest test here Allan Wake 2 it was playable at 1440p
19:57 using quality FS R which renders a little bit below
20:01 1080P and on the medium preset the PC averaged 42 FPS
20:05 in the opening scene I consider that good enough for a story
20:09 based title with path tracing literally baked into the game the PC
20:13 does a lovely job and lastly fortnite it's gotten surprisingly harder
20:18 to run over the years but we did get a good
20:21 enough score using the balanced resolution modifier and a mix
20:26 of medium and low settings with direct X 12 we averaged around
20:30 160 FPS it's choppier than I would like admittedly but still
20:34 pretty enjoyable I think with a few tweaks it would be
20:37 ready for competitive play overall I think this computer looks
20:42 and plays great if you exclude the cable extensions we're sitting right
20:46 around $500 for the entire system and it's upgradeable has Wi-Fi
20:50 and Bluetooth built-in great airflow just kind of everything that you
20:54 would want and the coolest part is that for just another
20:57 $200 or the price of a PS5 Pro you can actually build
21:02 an entire setup with a monitor a mouse a headphones
21:06 a pair of headphones a keyboard a desk everything you would need
21:10 and I'll have a video of that up uh in a few
21:14 hours or it might be up by the time you're already
21:16 watching this so go check it out thanks again atline audio
21:19 for sponsoring this video check out the mod mic 15% off
21:23 through Black Friday let me know what you guys think about
21:25 this PC and I'll see you guys in the next one peace