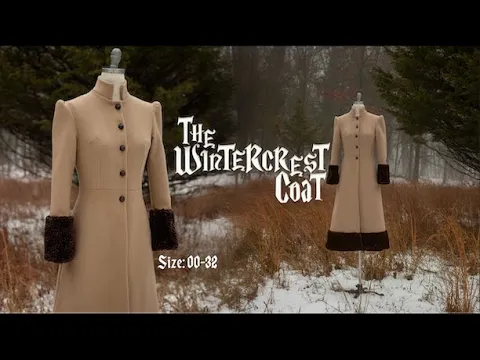
Sew Along ASMR! The Wintercrest Coat Sewing Pattern Tutorial for Vintage Lovers
Gunnar Deatherage
0:00 Hello and welcome to the tutorial for the winter crest coat.
0:03 If you're new here, my name is Gunnar Deathridge.
0:04 I'm a fashion designer and a costume designer and I create sewing patterns.
0:08 And all of my sewing patterns are designed so that even
0:11 a beginner can kind of work their way through them.
0:13 Now, some of them are a little bit more advanced,
0:15 but this tutorial and all of my tutorials are really in-depth.
0:18 I talk to you as I do it.
0:20 I give you tips and tricks along the way.
0:21 So, if you've ever been curious about sewing,
0:23 wanted to make your own clothing, this is a really great place to start.
0:27 Now, every month on my Patreon,
0:28 I release a brand new sewing pattern exclusively for my members,
0:31 and it lives there for a few months before I release it to the general public.
0:34 And it's a really fun community to join
0:36 if you're looking for other people that sew.
0:38 If you want to ask questions, share your inspirations.
0:40 We have a really great Discord full of really incredible people and creatives.
0:44 It's a really awesome place to start your sewing journey.
0:47 Now, maybe you don't sew and you need a little background noise.
0:49 A lot of people watch these tutorials as ASMR style videos,
0:52 so I kind of designed it so that it's an easy listen for you guys as well.
0:56 Now, let's talk about the winter crest coat.
0:58 This has been on my wish list to make for almost 2 years now.
1:01 It's very vintage inspired.
1:03 It's got beautiful structure, has a nice rounded shoulder cap to it,
1:07 great buttons down the front.
1:08 It's fully lined, even the sleeves.
1:11 And I walk through this tutorial on how to create it literally step by step.
1:14 And I'm going to give you some tailoring tips throughout this video
1:16 to make it nice and easy for you guys to create.
1:19 Now, if you have questions about sizing or yardages,
1:21 all of the patterns come with a size chart and the yardages required.
1:24 uh yardages refers to how much fabric that you need and we
1:27 split that up into like a fur uh which is like fabric two.
1:31 Um fabric one is going to be your outer fabric and then a lining fabric.
1:35 You'll also see something on there for an interfacing.
1:37 And if you're not familiar, an interfacing is a fabric that is sometimes
1:41 stitched or sometimes glued with like a iron cuz
1:43 it has like a little glue dot to it that fuses to the fabric when it's ironed.
1:47 Um those are like stiffeners for fabric.
1:49 So, if your fabric needs a little extra stiffening
1:51 in like the collar area or the cuff area,
1:53 you might want to use some of that there.
1:55 Now, as far as fit, this is a very fitted coat.
1:57 It's not one of those coats that has like
1:59 a giant oversized wear a lot of sweaters underneath.
2:01 It's fitted.
2:02 So, if you're looking for something that is going to be
2:04 slightly larger on you so that you can layer underneath of it,
2:07 I suggest sizing up a little bit.
2:09 One thing that we did include on here because
2:10 it's like practical because it's a coat is pockets.
2:13 Pockets are so necessary.
2:15 So, there are hidden pockets on the side of this coat,
2:17 and they're going to be a game changer for you when it comes to making it.
2:20 So, if you guys are ready,
2:22 let's go ahead and start the tutorial for the winter crest coat.
2:34 Let's begin working on the winter crest coat.
2:37 So, we're going to start working on the front bodice.
2:39 And for my video today, I will be using this wool coating.
2:43 Um, I actually purchased this from Mood Fabrics.
2:45 It is double faced, so both of them are the same.
2:48 For my lining, I'm using a very similar color.
2:51 It is a lighter weight satin.
2:52 And it kind of looks like this just so
2:54 you guys can see the difference between the two.
2:56 And then for my cuffs and the bottom of my coat, I'm using this fur.
3:01 It's a faux fur.
3:02 It's got a good webbing on it.
3:03 I will give you guys little tips on how to work with this a little bit later,
3:06 but for right now, we are going to start working on the front bodice.
3:09 And for this, I'm going to be using a wax-free tracing paper and a rotary wheel.
3:13 I use this a lot because it's got a powder on one side of it.
3:18 And whenever you use the rotary wheel, it leaves a little bit of this powder
3:23 onto the fabric and allows you to sew darts.
3:25 It's my favorite tool for sewing a dart.
3:28 Um, this has got two darts on the front.
3:30 They kind of like lead up to the same point.
3:32 The center of these circles is where the darts will kind of come to a close.
3:36 They can go all the way to the tip,
3:37 but I like to kind of have them end right around the center bits here.
3:40 You can literally see where the powder from the paper is on my hands.
3:43 Now, in order to do this, I'm going to mark where the darts go.
3:50 So, to do this, I'm going to mark both pattern pieces at the same time.
3:53 So, I've got them together.
3:54 I'm going to say that my right sides are together.
3:56 That way, this will be deemed the wrong side of the fabric.
3:59 And I'm going to slide the tracing paper into here.
4:05 And I'm going to make sure that it is lined up where the darts are.
4:09 You can kind of see here once this is flat out where the paper is through here.
4:14 And I know for sure that my dart is totally covered.
4:16 So I'm going to go and mark this one.
4:17 I'm going to push pretty hard so that I can mark on both sides of the dart here.
4:25 Now I'm going to do this one as well.
4:27 And what I did is I kind of sandwiched the fabrics just like that.
4:34 Sorry, the camera is shaking.
4:37 Now, when you pull this back,
4:38 you can kind of see it leaves you a line where the dart is going to go.
4:41 And because I sandwiched it, both sides got that.
4:43 Now, I'm also going to go ahead and mark the other dart as well.
5:10 and I can kind of see them here.
5:12 I'm going to take a little bit of a Taylor's
5:14 chalk just to trace out where my lines
5:15 are so I can better show you guys and I like a little bit clear of a line.
5:26 To be transparent, I've been using the same
5:29 waxree tracing paper for about 4 years now,
5:31 so it's probably time to get a new pack.
5:34 But that just goes to show you how good of an investment that they really are.
5:37 They last forever.
5:39 So now I've marked both sides here and I'm
5:41 going to go ahead and start by sewing.
5:43 Let me show you guys how I like to do my darts.
5:45 They're pretty simple.
5:45 The idea is basically that you're going to pinch
5:47 it in half and you're going to start
5:48 sewing at one end and it kind of tapers out to a little bit of nothing here.
5:53 So whenever I do a dart, I kind of pinch it in the middle and then
5:56 I start by sticking the pen through one side
5:59 and then I flip it over to make sure
6:00 that it's going through the line on the other side.
6:03 And that kind of helps me make sure that the dart is centered.
6:06 And I'm just going to kind of work my way
6:08 up doing that all the way up to that top point.
6:32 Just like that.
6:32 Now I'm going to go and pin this one too.
7:09 Now, we're going to take this over to the machine and sew.
7:11 I'm going to start here at the end and I'm dropping my presser foot down.
7:15 Doing a couple back stitches.
7:16 I'm also going to use a white thread today so you guys
7:18 can kind of see better what I'm sewing, just so you know.
7:25 Now I'm going to work my way up here following the lines of the dart.
7:31 And as I see here, it starts to kind of taper out into nothing.
7:34 You want to kind of like get it to like
7:37 where you're just sewing on the very tip edge here.
7:40 Do a little back stitch and pull that dart out.
7:44 Now I'm going to go and clip my threads.
7:47 So I have those out of the way.
7:51 Now let's do the other side here.
8:24 Okay, now that you've done this, you're going to repeat this to the other side.
8:29 And then you're going to want to press this flat and beautiful.
8:32 Now, this is a huge part of making coats or working with wools.
8:35 Um, you really have to press everything.
8:37 Do you see how this kind of like bubbles up here?
8:40 It's not really flat.
8:41 When this is pressed flat, it's going to lay so crisp.
8:45 It's going to make it look like you bought it from the store.
8:47 Um, if you're going to spend the money
8:48 on the fabric and take the time to make yourself something,
8:51 you want to make sure that you're also taking
8:53 this extra step to make sure that it looks
8:55 professional because it's just a big part of the process
8:58 and um it's my favorite part of the process.
9:00 So, go ahead and press this flat and beautiful.
9:02 And then repeat this to the other side.
9:06 Now, let's talk about the back bodice.
9:08 You should have cut two of these out of your main fabric, two out of the lining.
9:11 They also both have darts.
9:12 So, I'm going to have you guys repeat the same thing that we
9:15 did to the front with the rotary wheel and the waxree tracing paper.
9:19 Do the darts on the outer shells and on the linings.
9:22 I'm not going to show it on camera.
9:23 It's the same exact step.
9:24 So, go ahead and do the darts on the outer shells.
9:27 Do it on the linings.
9:28 Press them beautiful.
9:29 And then I'll meet you back over here
9:30 to the table and we'll talk about the next step.
9:33 Okay.
9:33 So, I have got my back pieces here.
9:35 See how nice and pretty it looks when they've been pressed flat.
9:38 We are going to go ahead and stitch them
9:40 together at the center back seam with right sides facing.
9:43 I'm just going to put them together with my good sides facing each other.
9:49 And I'm going to pin the whole way up.
10:02 Okay.
10:02 Now, we're going to stitch this half of an inch here.
10:05 And then we're also, while we're here,
10:06 going to go ahead and do the same thing to the back linings.
10:09 So, mine are right here.
10:10 I'm just going to repeat this to these.
10:12 Let's go ahead and stitch.
10:34 Okay, now let's go ahead and take this over
10:36 to the sewing machine and give everything a good press.
10:40 And then repeat the same thing to the back lining.
10:42 Now, we want to attach the front to the back.
10:45 I am just going to lay them together with right
10:47 sides facing at the side seams and at the shoulders here.
10:50 And we are going to begin by pinning those together.
11:07 Now let's do the sides as well.
11:46 Now that I've pinned the sides and the top,
11:48 we are going to take this over to the machine and sew.
11:51 These are going to be simple straight across seams at half of an inch.
12:29 Good.
12:30 Okay.
12:30 And now I'm going to do the other side here.
12:59 Now, after you've sewn the sides and the shoulders, you're going to go through,
13:02 trim your threads, take the pins out,
13:05 and then take this over to the ironing board.
13:08 Give everything a good press and then
13:10 we're going to start working on the lining.
13:12 So, we've already done the lining back.
13:14 But before we can attach the front to the back,
13:17 we have a little bit of work to do
13:18 on the front lining piece because there is a facing.
13:21 So, I'm going to go ahead and take this over, give it a good press,
13:23 and then I'll meet you at the table and we
13:25 will talk about the front facing and the front lining.
13:28 Okay.
13:29 Now, we need to talk about the front bodice lining.
13:33 The reason that we didn't do these the exact same
13:35 as the front bodice outer part is because it's a different pattern piece.
13:39 Uh there's actually a second part of this piece,
13:42 which is the front bodice facing,
13:44 which kind of makes it into the same shape as the outer layer.
13:47 Um we do this because a facing is
13:49 going to give you a little bit more sturdiness, especially where the buttons go.
13:53 Um it also just like if it happens to like fold over,
13:56 you see the outer layer like the the suiting
13:59 the coat fabric instead of the lining.
14:01 um it just really kind of gives more of a structure
14:04 to the coat and it's just the tra traditional way of doing it.
14:07 Now, just like we did on the outer layers,
14:10 we're going to use a little bit of the tracing paper and a rotary
14:14 wheel and we're going to do the darts on the front bodice lining.
14:17 Um you guys already know how to do this.
14:18 So, go ahead and do the darts on the front bodice linings and then I will
14:22 show you how we're going to attach
14:24 the front bodice facing to the front bodice lining.
14:27 Okay, now it's time to attach the side front linings.
14:30 As you can see, I pressed mine here.
14:31 I should probably give it a little more of a press.
14:33 It's going to go right through here.
14:36 There is a notch on the front bodice lining right
14:39 here that will match up with this notch right here.
14:42 But you're basically simply going to attach them with right sides facing.
14:46 So, I'm just going to pin them together.
14:48 Now, if you're working with a fabric
14:50 that you think needs a little extra stability, you would cut an interfacing,
14:54 which can be fused on or stitched around
14:56 the edges that would go to the front facing.
14:58 My fabric has a really nice amount of structure,
15:00 so I'm not going to be adding one to mine.
15:02 Um, it's optional, but a lot of the time,
15:05 if you're working with like a little bit of a flimsier
15:06 fabric or if you like a really crisp front,
15:09 then you would add a interfacing on there.
15:12 And there's a lot of different kinds of interfacing.
15:59 Once you have them pinned together like this, we're going
16:02 to take this over to the sewing machine and stitch.
16:04 So, I'm just going to go and sew here.
16:59 Now after you have stitched this, you want
17:01 to go through and remove all the pins.
17:06 And then you're going to want to press this flat
17:09 at the ironing board so that it lays really beautifully.
17:12 Um, this is kind of what it will look like,
17:14 especially once it's pressed really gorgeous.
17:17 So, go ahead and press this out nice and flat.
17:19 And then repeat this to the other side.
17:21 Now, it is time for us to go through and attach
17:23 our fronts to the backs at the shoulder and the side seams.
17:27 This is what my finished one looks like here.
17:29 So, I'm just going to place these on here.
17:30 And we're going to do this just like we did the front.
17:33 It's just pinning at the shoulder and at the side seams.
17:35 So, go ahead and pin those together.
17:37 Do both sides.
17:38 I'm not going to show this again cuz it looks the exact
17:40 same um but a little cleaner because my lining fabrics are so flimsy.
17:46 Um so, go ahead and do this and then I'll meet you back here.
17:50 Now, let's take a second and talk about the outer sleeve.
17:52 So, the sleeve lining is one singular
17:54 piece and that's because it's not color blocked,
17:56 but my sleeve is color blocked because we have some fur at the bottom.
18:00 Now, my fur is super flimsy, so I actually cut an extra piece of my outer shell,
18:05 and I just kind of stitched it right at the very outside edge.
18:08 You'll never see this once it's sewn together.
18:10 Um, your fur might have a really nice backing,
18:12 but the one that I chose is kind of flimsy.
18:14 It's not going to hold as much structure as I'd really like for it to.
18:16 So, that's why I just wanted to explain that to you.
18:18 You'll see that when I'm sewing.
18:20 Now, I'm going to begin by stitching these together with right sides facing.
18:23 You'll see that there are notches here to help you line those up.
18:26 Just going to get these out of the way.
18:28 And I'm going to flip this over here.
18:30 Now, one thing that I like to do is when I am sewing fur,
18:34 I like to slide the fur down so that it's
18:38 all facing away from where I'm going to be sewing.
18:41 And that way, once it's sewn, the fur, all of it's not caught in the seam.
18:47 It's harder to do with a short fur.
18:49 Um, and you might I will show you a little trick afterwards
18:52 that I'm going to do to help make it look a little more natural.
18:58 But for right now, I'm just going to kind of push slide my finger
19:02 in and allow some of that fur to be angled the other way.
19:18 Basically want to trap it inside the seam here.
19:52 Now, Now that you have got yours pinned, let's go ahead and stitch.
19:55 So, I'm just going to sew all the way across here to half of an inch.
20:32 Okay.
20:33 Now, go ahead and take your pens out so that you can examine everything.
20:36 And I'm going to show you what I like to do.
20:38 So, as you can see here, got a little extra fur clinging to the coat,
20:42 but there's a really clean line right here.
20:45 of where the fur is sewn into the the seam.
20:49 I like to take just a little bit of I'll take a pin and I will just
20:54 kind of pull some of that fur out to make it a little bit less trapped in there.
21:02 I would say press.
21:03 If you're using fur, it might be tricky,
21:05 but I would try to give it a little iron even if you don't use steam,
21:08 but you don't want to flatten out all of the fur.
21:11 So, go ahead and repeat this to the other side here.
21:13 and then we'll go to the table and I'll show you the next step.
21:16 Before we sew the side seam of our sleeve,
21:19 let's talk about the anatomy a little bit.
21:20 Now, you'll see that there is a front
21:22 that has a harsher curve than the back through here.
21:24 This is important because when we sew these into the actual body,
21:27 this will be very important.
21:29 Also, you'll see up here a line that says
21:30 gather and there are notches here and here.
21:33 This is important because we are going to be doing a gather stitch.
21:38 So, I'm going to mark with a little bit of Taylor's chalk.
21:40 You can use pens if you want to.
21:43 And this is going to show me where I need to create a gather stitch.
21:45 So, I'm going to go ahead and begin doing that.
21:47 Gather stitches are pretty easy.
21:48 You just want to turn your machine to the longest
21:50 stitch length and then release a little bit of the tension.
21:53 So, I've got my stitch length all the way up here.
21:56 You're going to do this at less than a/4 of an inch or 1/4 of an inch.
21:59 Um, something that's not going to show when the sleeve is sewn together.
22:02 I'm starting with a batch stitch on one side.
22:05 Back stitch, I'm sorry.
22:06 And I like to clip those tails right here
22:09 cuz then I just feel like it gets less confusing.
22:12 Um, now I'm going to sew around the top edge here right at the very edge.
22:18 Now I'm going to stop where my other notch is,
22:21 but I'm not going to do a back stitch.
22:22 So leave these tails long.
22:24 These are the ones that is going to show us where we're going to gather in.
22:28 These are important.
22:29 So don't clip these off.
22:31 Now let's go ahead and stitch the sleeve.
22:33 Um, what I'm basically going to do is with the right sides facing,
22:36 I'm going to fold it in half like this.
22:38 And I'm gonna start pinning right here where the fur starts.
22:45 And this is going to make sure that when it's all sewn together,
22:49 everything is going to align perfectly.
22:56 You don't want the fur to start and stop at a different
22:58 place in case something happened when you were sewing it together.
23:01 It should be perfectly in half.
23:02 But fur is a if you're using a fake
23:05 fur is a bulkier fabric than the other fabrics.
23:09 That's kind of the beauty of this style of coat is
23:12 that um it almost feels like there's like a muff on the sleeve,
23:15 you know, like it's got a thicker, more um bulky feeling around the wrist area.
23:23 Okay.
23:24 Now, I'm going to work all the way down here.
23:26 Like I going to do my trick where I push
23:27 the fur inside as much as I can at least.
23:33 all the way down until the very edge.
23:43 Okay, now I'm going to sew.
23:46 Now I want to make sure I turn my stitch length back down a little bit.
23:58 Okay.
24:02 Half of an inch.
24:17 Wool is kind of a tricky fabric cuz it does it gets pushed and moved around.
24:21 It's like a natural fiber.
24:23 So, it's easy to do that.
24:24 So, I like to always kind of like massage
24:26 everything in, make sure it's laying exactly where I want.
24:30 This is one of those fabrics that takes a little bit of time
24:33 to get used to working with, but I have to tell you,
24:35 it is one of my favorites to work with.
24:37 Now, I've already folded the sleeve in half and I have stitched down the inseam.
24:43 And now, I'm going to go press this open flat and beautiful.
24:46 And now, we are going to do the same steps to the sleeve lining.
24:49 You're going to create a gather stitch along the top in between the notches.
24:52 and you're going to fold it in half and stitch
24:54 the inseam just like we did on the outer shell.
24:56 Uh it looks the exact same, so I'm not going to demonstrate this section of it.
25:01 Um so go ahead and follow the previous steps to your sleeve lining and then
25:04 I will show you guys how we're going to actually sew the sleeves in.
25:07 It is now time for us to insert the sleeve into the body.
25:10 Now, it's important to note that there's a front and a back.
25:14 This is the front of my sleeve.
25:16 You can kind of see when you lay them together
25:17 that like one side sticks out a little bit more.
25:20 The one that sticks out a little bit more is the back.
25:22 The one that has a deeper cut is the front.
25:24 It just allows for more movement in the body when you're wearing it.
25:27 So, my favorite way of doing this is to actually flip it from the inside here.
25:31 So, you can see all my inner workings here of the bodice.
25:33 And I'm just going to align the underarm seam
25:36 of the sleeve and the underarm seam of the body first.
25:39 It's the very first thing I'm going to pin together.
25:46 Now I'm going to work my way all the way up
25:49 pinning with the right sides facing the sleeve to the body.
25:52 And I'm going to pin all the way up
25:54 to where we started our gather stitch right here.
26:01 See, this is our gather stitch.
26:02 This is the tails.
26:03 This is the part that I'm going to pull from.
26:04 Now, I'm going to stop pinning right there on this side.
26:07 Now, let's do this side over here.
26:25 And I'm going to stop pinning again right where the gather starts.
26:33 Now, if you'll see here,
26:34 it looks like there's a little too much sleeve to fit, right?
26:37 So, this is where the gather stitch comes into play.
26:43 So, what we're going to do is pull on one side here.
26:50 You want to make sure not to break the thread.
27:05 And this is just going to make it fit into the armhole a little better.
27:22 Like so.
27:23 Now, this is the same length here.
27:25 So, I'm just going to pin this into place.
27:50 Just like this.
27:55 Now space your gathers out.
27:57 Make sure everything is looking nice the way you want it to lay.
28:00 And now we're going to go through and we are just going to stitch this together.
28:05 Now, just like the pinning,
28:08 it's easier to sew this from the inside cuz you can kind of see everything.
28:15 Now, I'm just going to start with a little back stitch here.
28:23 Sewing this at half of an inch.
29:06 Okay, now I am going to take my pins out, check my work,
29:10 and then I'm going to repeat this to the other side.
29:13 And then we are also going to sew the sleeve
29:15 lining into the lining body just the same way.
29:19 We're going to insert it the exact same way as this.
29:22 So, you're going to be doing sleeves for a little while,
29:25 but go ahead and check your work.
29:27 See, that's going to look really nice.
29:29 That's the underarm seam here.
29:31 And here's the sleeve cap.
29:32 Now, go ahead and check your work, do your other sleeves,
29:38 and then I'll meet you back at the table.
29:40 Now that we have the sleeves in the bodice and the sleeves in the bodice lining,
29:44 we're going to talk about the front skirt and the front bottom.
29:47 So, the front bottom is piece J.
29:50 Mine is fur.
29:51 And piece I, which is the front skirt, is going to be my actual main fabric.
29:58 You'll see here that there is a notch here that lines them up.
30:01 So, what we're going to do is we're basically going to sew
30:03 them on kind of like what we did to the sleeve.
30:04 These are going to go together with right sides facing.
30:07 Let me turn this towards me.
30:09 Now, it is important to note that there's a little bit of a curve on here.
30:12 So, you want to make sure that those line up really nicely.
30:35 Now, if you'll notice the like I talked earlier,
30:37 I backed my fur with another spare piece of my outer fabric.
30:41 Uh it's not for the look.
30:43 Uh it's just for function.
30:44 And you could use interfacing if you have it,
30:47 or maybe your fabric, like I said, doesn't need it.
30:50 Um I chose a super flimsy fur because I liked the look of it.
30:54 Um, so I kind of did a little bit of magic to make it have some stability.
30:59 Uh, which is, you know, part of design is understanding fabrics and how to make
31:03 them look the way that you want them to look.
31:05 And also understanding like what their, uh, limitations are.
31:08 And I have spent a lot of time working with fabrics that are not meant
31:14 to do what they're supposed to do and trying to make them look a certain way.
31:18 and backing things is a really great way of giving
31:21 things structure and stability that don't necessarily have it.
31:24 Okay, I have not got them pinned together.
31:26 Let's take this over to the sewing machine and stitch.
31:28 So this is also at half of an inch.
31:54 Okay, now we are going to take the pins out.
31:57 Check the work.
31:58 Give it a good press at the sewing machine.
32:00 And then we're going to repeat this step to the other side.
32:03 And the front panels will be finished.
32:11 Okay.
32:11 Now, let's talk about the center back here of the skirt.
32:14 You should have cut two of these.
32:15 There will be a portion that says center back.
32:17 What we're going to do is stitch them together with right sides facing.
32:21 So, I'm just going to go through and pin these together here.
32:26 One thing I like about the pattern of this is
32:28 that it kind of hugs the hip and then flares out.
32:31 I think it feels very retro, very vintage.
32:37 Just going to confirm this is the center back.
32:39 Here it is.
32:46 Now I'm just going to go through and pin these together.
33:37 Okay, I'm going to go ahead and take this over to the machine and stitch.
34:09 Okay, now I'm going to remove the pins and take this over
34:13 and give this a really good press at the sewing machine.
34:16 And then I'm going to meet you back at the table where we're
34:18 going to attach the lower skirt to the back skirt in the back.
34:22 So, we've got back skirt piece M up here at the top.
34:27 And down here, I have my back bottom skirt, which is piece N.
34:34 I cut one of these on the fold.
34:36 And like I did on the front, I also kind of backed mine for some stability.
34:40 Now, we are going to attach these together.
34:42 And I'm going to do it with right sides facing.
34:45 So I'm just going to pin all the way across here just like we did on the front.
34:51 Now both of these are on a curve.
34:53 So there's going to be a little bit um of bias in here because it
34:57 is on the curve and there's a little stretch which is going to come in handy.
35:02 Um I like to kind of work my way from the outside in on these because I think
35:07 that it makes it um a little easier to kind
35:10 of negotiate where you are going to have everything land.
35:17 Like it will seem like maybe like one is too big for the other,
35:19 but that's not true.
35:21 You just kind of have to like follow in line here.
35:57 Okay, now I'm going to take this over to the sewing machine and stitch.
36:31 Okay, now I'm going to give this a good press.
36:33 Trim away my seam allowances if it feels a little bulky.
36:36 I've been trimming away about half my seam allowance
36:38 on the fur areas cuz it can be a little bulky.
36:42 And then we are going to head over to the table and I'm going to talk
36:46 to you a little bit about what we're
36:48 going to do next when we're inserting a pocket.
36:54 The front skirt lining and the front skirt facing, which is piece K and piece L.
36:58 You'll see that there's a notch here that lines up perfectly,
37:00 and that's to show you where they go.
37:02 Now, essentially what's going to happen is the front facing is going
37:05 to get sewn onto this and this will kind of complete this piece.
37:07 It's a lot like we did the front lining
37:09 at the top where there's a little bit of facing.
37:11 This is to give us a little bit
37:12 of sturdiness where we do the button holes and buttons.
37:15 Um, it adds a little bit of weight.
37:16 It really just kind of helps with the structure of a coat.
37:19 So, what I'm going to do is I'm going
37:20 to drop this on here with right sides facing.
37:25 And we are just going to pin this directly to the front here.
37:31 and then stitch.
37:32 It's pretty simple.
37:36 You just want to make sure that your front edges line up.
37:38 Like these front edges here.
37:40 Um my lining is misbehaving.
37:44 I'm having major regrets about the weight of it.
37:48 It will look fine.
37:50 Um it just sucks to sew,
37:53 which I feel like a lot of people that sew also understand as much as I teach.
38:01 And I like to present myself as a professional.
38:03 I'm also just like someone that sews
38:05 and I understand the issues of some fabrics.
38:09 So I am right there with you.
38:12 But as long as we get you to the finish
38:13 line and get you loving the coat you're making, that's all that matters to me.
38:18 Okay.
38:19 So I've got my pins in here.
38:20 I'm using a few extra because like I said,
38:23 working with a very difficult lining fabric.
38:26 And now I am just going to take this over to the sewing
38:29 machine and then stitch this up with half of an inch.
38:57 Okay, now I'm going to take the pins out.
39:00 Give this a good press.
39:01 And then I'm going to repeat this to the other side.
39:04 And then I will show you how to attach the front to the back linings.
39:11 And then we can move on to working on the pockets.
39:14 Okay.
39:15 And now we need to sew the back skirt lining together.
39:17 This is just like the outer shell.
39:19 There's a center back seam here.
39:20 You're going to sew them together with right sides facing.
39:23 Press it open.
39:24 Um I don't need to demonstrate this cuz
39:25 it looks exactly the same as we did before.
39:28 So just pin the two pieces together of the back skirt lining, which is piece O.
39:32 And then you're going to press them open flat and beautiful.
39:35 And then we can attach the back to the front at the side seams.
39:39 Okay.
39:39 Now I have my front skirt lining
39:41 and back skirt lining together with right sides facing.
39:43 You can see the front facing here.
39:46 I'm just going to pin these together all the way down here at the side.
39:51 And then we are going to stitch them together at half of an inch.
39:55 I'm going to take this over to the sewing machine, but it's pretty simple.
39:58 It's just one stitch all the way down.
40:28 Okay, like I said, you're going to repeat this to the other side.
40:32 Press this open flat and beautiful.
40:34 And then your skirt lining is finished.
40:37 Now, before we sew our front skirt
40:39 and our back skirt together at the side seams, this is my side seam right here.
40:42 You can see that there are two notches here.
40:45 Those notches are going to line up with the pocket,
40:47 which are going to be right here.
40:49 Now, we're going to just work on one at a time really.
40:52 So, I'm going to start with just the front skirt.
40:54 You'll understand why in a moment.
40:55 So, I've taken one of my pocket pieces here,
40:57 and I have gone ahead and drawn for you where the two notches are on here.
41:02 And then I also drew a line half of an inch across with some Tailaylor's chalk.
41:06 You don't have to do this, but I think
41:07 a visual of explaining what I'm about to do is easier.
41:10 So, the style of this pocket is that it's hidden inside of the seam.
41:13 And in order to do this, we have to kind of do a little fun trick.
41:16 So, I'm going to go ahead and show you how we're going to do that.
41:19 So, I have gone ahead and drawn where
41:20 the notches are on the front piece here for you.
41:22 And you'll see that they line up perfectly with the pocket.
41:25 Now, what I'm going to do is I'm going
41:26 to put the pocket with right sides facing directly on here,
41:29 lining up the notches.
41:30 Okay.
41:37 Now, we're just doing this with one of the pocket pieces for right now.
41:40 What we are going to do is we are going to sew up, stop,
41:44 all the way over, stop, and then all the way down,
41:46 creating like a little rectangle style stitch.
41:48 I will show you why in a moment, but let's go ahead and stitch this.
41:52 Okay.
41:52 So, I'm just going to start at the edge here.
41:55 Remove a pen.
41:56 Making sure everything is still lining up.
41:58 Now, I'm going to start at the edge.
42:01 Little back stitch here.
42:06 Now, I'm leaving my needle inserted at the edge of this rectangle right here.
42:10 Now, I'm going to lift the presser foot like this.
42:14 See how it's lifted?
42:15 So, I can swivel my fabric.
42:17 And now, I'm going to make sure
42:19 that these are still lined up here, the two edges.
42:21 And I'm going to work my way down that half of an inch line that I drew.
42:26 You don't have to draw on yours.
42:27 You can just use a guide on the sewing machine if you want.
42:32 Now, as I approach the edge over here, just like so.
42:36 I'm going to leave my needle inserted.
42:39 And I'm going to swivel the fabric again,
42:42 and I'm going to sew towards the edge to kind of complete this little rectangle.
42:48 And I'm just going to do a little back stitch.
42:50 Pockets get a lot of tension, so little back stitch is necessary.
42:54 Now, while we're here at the sewing machine,
42:58 I'm going to cut a little relief cut right here at an angle towards the corner,
43:01 but not going through it.
43:02 Now, I'm going to do the same right here.
43:07 And I'm just going to also cut out the little triangle piece right there.
43:11 Like, cut this off.
43:13 You want this to be able to be workable and usable.
43:17 You can also cut half of this away if you want,
43:19 if you're working with something a little bit thicker.
43:21 Now, here's why I had us do that.
43:22 Because once this is flipped to where the right
43:25 side is out like so, it looks like this.
43:31 That little triangle or that little rectangle is going to be apparent for us.
43:36 And this right here becomes the seam allowance
43:39 where we sew the front and the back together.
43:40 And it leaves us with this clean finished edge.
43:43 Now, as you'll see here, mine is really bubbly.
43:45 And that's because you have to press it.
43:47 Um you it is like a non-negotiable.
43:50 Honestly, you have to iron this nice and flat right here first of all.
43:55 Then once you flip this over,
43:56 what you can do is if you want to stitch right here
44:00 only like start and stop where the little corners of the rectangle are.
44:04 This is called an underst stitch.
44:05 And this stitch right here will help hold everything in place
44:07 and that way when it's underneath it is also again nice and crispy.
44:10 So let me show you what mine looks like and how I'm going to do that.
44:14 Okay, so I have actually given this a good press.
44:16 Do you see how flat this is laying now?
44:17 And so you know this is the pocket side.
44:19 See the pocket here?
44:20 This is my front skirt right here.
44:23 As you see here, there is like one single little stitch, the little white.
44:27 And if I pull down, there's another single stitch here.
44:30 This is like the rectangle.
44:31 This is that little corner.
44:32 So, I'm just going to create a little under stitch.
44:35 And this is something that like only the inside of the pocket will see.
44:38 It starts right where that uh little stitch is at the corner.
44:43 And I'm doing this at literally like quarter of an inch.
44:45 It's like so minimal where it is.
44:49 And I'm going to stop right before I get to that little corner right here.
44:53 Just like so.
44:54 See how skinny that is?
44:56 You won't ever really see that.
44:57 Um, this is the inside of the pocket.
44:59 So you really, it's not a noticeable seam,
45:02 but it is an important one because what happens now is once
45:05 this is flipped under like this and then ironed one more time flat,
45:11 and when you do that, you'll want to pull these little corners out here.
45:15 Um, I'll show you what mine looks like after I have ironed it.
45:18 But this is going to help keep that pocket nice and crisp.
45:21 It's going to make it usable.
45:23 Um, it is just like something that a lot of tailoring
45:25 techniques have you do because it just makes it functional um,
45:28 and make it look pretty, which I think is the point of making your own clothing.
45:32 So, let's go ahead and give this a good press.
45:34 So, see how this little rectangle here is nice and flat.
45:37 I'm going to go and press this and I'll show you our next step.
45:40 Okay, now let's sew the other half of this pocket on.
45:43 As you see right now, this is the functional pocket.
45:45 One thing I should have noted earlier, but I will note now is that the wide
45:48 fat part of the pocket should be angled towards
45:51 the bottom of the skirt cuz that's like where
45:52 the hand goes in and you want it to be comfortable.
45:55 I made sure that these pockets were like a usable
45:57 size too cuz I know sometimes pockets are too small.
46:00 So, what I'm going to do now is I'm going to put the right
46:02 side facing of the other half of the pocket here directly onto it.
46:05 They should match up perfectly.
46:07 And we are going to be sewing around the outside edges.
46:10 Not this up here, just around the outside edges.
46:13 So, in order to do that, I'm going to pin them together around the outside edge.
46:28 Now, I'm using my same fabrics as the outer
46:30 shell because you do see this from the pocket,
46:31 but maybe you're going to use your lining for your pockets so that it's really,
46:35 really, really invisible.
46:36 Um, that's also a possibility.
46:38 Sometimes these pockets can feel a little thicker,
46:40 but I personally like when the pocket looks super invisible from the outside.
46:47 Okay, so Oh, I'm also going to go along the top here.
47:01 Okay, now we're going to sew all of this right through here.
47:05 Now, I'm sewing this at half of an inch.
47:31 Okay.
47:32 Now, afterwards, if you're overlocking your seams
47:34 or finishing them out in a certain way,
47:36 now would be a good time to do this to the pocket.
47:38 Um, some people will also do a second stitch right next
47:41 to it to make the pocket really sturdy because you never know.
47:43 You don't want your pocket seam to bust and have
47:46 your phone or your chapstick fall inside of your coat,
47:49 uh, which sometimes happens when a pocket busts.
47:51 So, if you need to go ahead and reinforce this seam and then let's move on.
47:55 Okay, so this is what yours should look like here from the outside.
47:58 This is that second half of the pocket we just sewed on.
48:00 And then obviously this is the finished out
48:02 first side with that little under stitch here.
48:04 But as you can see, this is all going to be seam allowance.
48:07 And basically the stitch is going to start here.
48:10 I mean, we're going to sew the whole way up.
48:11 But this is not going to get sewn
48:13 into the seam because this is where the pocket goes.
48:15 And we already kind of finish that out,
48:16 which is why we did those first couple of steps.
48:18 Now, let's attach the back to the front at the side seam here.
48:22 So, I'm just going to place them together with right sides facing.
48:25 Now, a couple of things to note is we have this color block bit down here.
48:29 These are going to line up perfectly.
48:31 Take the time and make sure that you are pairing these seams in a way
48:37 that they're going to line up perfectly because this is a really noticeable
48:42 and kind of like defining part of the coat is this kind of color
48:46 blocked strip at the bottom and you want it to look as good as possible.
49:04 Now, I'm going to pin this together.
49:06 Like I said, it's right sides facing.
49:07 We're working our whole way up here.
49:09 This will line up perfectly all the way to the top.
49:12 But, as you'll see, we're going to pin this all together right here.
49:15 Um, this is where you're going to have
49:17 to be really careful when stitching because you want
49:19 to make sure that you're not catching that finished
49:21 edge that we just did in the stitch.
49:31 Like so.
49:32 Now, if it's helpful, you could also pin the seam allowances
49:36 of the pocket together right here before you even pin
49:39 this on, just to make sure that you know it's going to line up once it is sewn.
49:44 Sometimes I like to do that as a precaution cuz when you're
49:48 working with like I mean this is basically four layers of fabric here.
49:51 It's really thick in this one singular area.
49:53 So I think a little extra help is necessary.
49:57 Just like that.
49:58 Now I can pin on my outer layer.
50:01 Not my outer layer, my back layer.
50:11 Okay.
50:11 Now, with this seam allowance here,
50:13 it's important that you pin these together also,
50:15 but you're, like I said, it's only the front and the back.
50:17 You're not catching this finished edge in what you're pinning together here.
50:21 So sometimes I even like to push that down in there
50:22 a little bit just to really get it out of the way.
50:41 Okay, now let's go ahead and stitch.
50:44 So I'm going to work my way from the top to the bottom.
50:46 I'm going to sew it on the side with the pocket
50:48 out so that you guys can really see what I'm doing here.
50:59 Okay.
51:00 Now, I've reached into the point where the pocket is.
51:02 Okay.
51:02 Sometimes I do a little back stitch here just to really hold that in place.
51:06 This right here is where that little rectangle is that we cut out.
51:09 I'm going to stitch.
51:10 Now, this I'm going to back stitch here slightly.
51:12 This is like just to make sure everything is secure.
51:16 Now I'm going to sew down making sure I can feel where
51:19 this edge is of that finished edge and I don't want to get that.
51:22 Do you see how my sewing machine here kind of bounced off of the stitch?
51:27 That to me is a sign that I need to switch my sewing foot.
51:30 So I'm going to quickly go from a normal
51:34 one just like this is like a normal sewing
51:36 foot to a narrow zipper foot that is going
51:39 to allow me to stitch right next to it.
51:42 This is not a necessity.
51:43 Also, forgive me.
51:43 I'm using a bobin to tighten it.
51:46 So, what this allows me to do is get right next
51:48 to that stitch without see now it's just going to go right
51:54 up next to that finished edge that's sandwiched in there and it's
51:59 not going to get in the way like the the flat one.
52:04 This one here has a hard time going on two different surfaces at an angle.
52:09 And there is a sewing foot that has a spring in it,
52:11 but that's typically for a, um, industrial sewing machine like I'm using,
52:15 and I know a lot of you use a home sewing machine, uh,
52:18 which I also use a lot, and those are not as easy to find.
52:21 So, I always suggest the narrow zipper foot because
52:24 I think it does just as nice of a job.
52:34 No, I'm sewing all the way down here.
52:47 at this half of an inch.
52:51 Now remove the pins.
52:53 Check your work.
52:54 Make sure everything is pressed beautifully.
52:57 And then you're going to repeat this to the other side.
52:59 And when I say check your work,
53:00 flip this over and make sure that you can get your hand in the pocket
53:03 and that you didn't catch any of that finished
53:05 edge in the seam that we just did.
53:08 I'll show you what that's supposed to look like.
53:12 See how I can get my hand in this pocket here and it's hidden?
53:16 It kind of looks like this from the other side.
53:18 It needs pressed because right now it's a little bulky right here.
53:21 But this is what we're wanting.
53:22 It's going to be invisible when it's done.
53:25 Now, after you've done this side, repeat this to the other side,
53:28 and I will meet you back at the table.
53:30 Okay.
53:30 Now, it is time for us to attach the top to the skirt area.
53:34 So, as you'll see here,
53:35 the side seams of the bodice match up with the side seams of the skirt,
53:39 as well as the center back seam here of the bodice,
53:42 center back of the skirt, and side seam right here as well.
53:46 Those are our key points that we want to match up.
53:47 And then from there, everything else will line up really perfectly all the way
53:51 to the center front here, as you can see.
53:53 So, what I'm going to do is I am going to flip
53:56 this over and we are going to pin them together with right sides facing.
54:00 And I'm going to start at the center back.
54:03 Put a pen right in the center.
54:04 Uh, this is an important one to make sure
54:06 that lines up really nicely because it's going to show.
54:10 Uh, I think the center back of like one of like the more focal points of a coat,
54:16 especially for those people walking behind you.
54:19 So, let's pin also at the side seams here.
54:21 I now know that those are going to match up.
54:23 And this one here.
54:37 Now I'm going to pin the rest of it all the way across.
54:49 Okay.
54:50 Now, let's take this over to the sewing machine and stitch.
55:54 Okay.
55:55 Now, check your work.
55:56 Take the pens out.
55:57 Press this flat and beautiful.
55:59 You have to iron this.
56:01 If there's any part of this coat I'm going to make you iron, it's this part.
56:04 It's really important.
56:05 So, go take this over.
56:06 Give it a good iron.
56:08 And then I'll meet you back at the table.
56:09 I've got a little bit of different instructions about the lining.
56:13 Uh it's basically the same stitch,
56:15 but I am going to have us leave a little bit of an opening,
56:17 and I'll tell you why in just a moment.
56:19 So, let's talk about the lining.
56:21 Um it's basically the same thing, right?
56:23 Where the bodice attaches to the skirt.
56:25 The thing I'm going to have us do that is a little different is
56:28 I'm going to have us leave a gap in the middle that is open.
56:31 And I'll tell you how and why.
56:33 So, I'm going to make mine about 10 in.
56:36 Okay, this is enough for me to get inside of the coat and to sew the sleeves.
56:42 Um, you'll understand why we're going to do all
56:44 of this a little uh differently in a moment,
56:47 but trust me that this is probably the easiest way of going about it.
56:51 There is a little hand sewing involved, so don't worry about that.
56:54 I will walk you through that, too.
56:56 Now, this is my very center back here.
56:59 And this is how I'm going to attempt this.
57:02 I'm just going to measure out 10 in here roughly.
57:07 There's no exact because this is just um going
57:10 to get sewn up later at a different time.
57:12 So, for right now, I'm going to pin on each side of this.
57:16 So, this 10 in right here, I'm going to be leaving open.
57:19 This is going to be my entry point into the jacket lining.
57:23 And that is there so that we can sew the sleeves.
57:26 Uh I will show you how, but for now,
57:29 I'm just going to pin the outside edges here.
57:31 So, this is the outside.
57:32 Working my way over to that first pin.
57:53 Okay.
57:53 So, I have this side pinned right here.
57:56 Now, I'm going to go to this side and pin I'm going
58:01 to go over to this side and pin from the outside here.
58:04 Working over to this pin.
58:34 Now, let's go ahead and sew.
58:37 Okay, so I'm just going to start on one side
58:40 and I'm going to work on the outer edge here.
58:42 This is like where my front facing is.
58:49 Now I'm just gonna sew all the way over to where I want my opening to start.
58:58 This is my pin that marks where that opening starts.
59:02 And I'm just going to do a little back stitch right there at that pin.
59:05 Lock that into place.
59:06 Okay.
59:08 Now I can remove these pins.
59:13 Now I'm going to go to the other side of the opening.
59:15 So this is the opening here.
59:17 And I'm gonna start stitching at this pin here.
59:33 And I'm going to do a back stitch at the edge.
59:36 And so I will show you what this looks like so
59:39 that you guys can make sure that yours looks the same.
59:42 But essentially when I open up I'll take this over to the table.
59:45 Actually, let me open the lining up here so you can see.
59:48 But so this is my waist seam of the lining.
59:58 You can see there's the facings on each side all sewn together,
1:00:01 but there's a gap here in the middle.
1:00:02 This is what we wanted.
1:00:04 This will get sewn up in the end
1:00:05 with a little hand stitch um or a little top stitch, whatever you prefer.
1:00:09 But for right now, we need this cuz we're
1:00:11 going to get to the sleeves in a little bit.
1:00:12 So, for the moment, I'm going to set the lining aside.
1:00:15 I we'll iron this out nice and flat so it looks good,
1:00:18 but then we're going to move on to the belt loops really quick.
1:00:22 Okay, let's talk about the belt loops for a while.
1:00:23 So, this is my belt loop piece, which is Q.
1:00:25 I want you to know that this is my sample,
1:00:28 and yours is going to be slightly longer.
1:00:30 Now, I've actually made mine considerably longer.
1:00:33 I did this for a couple reasons.
1:00:34 The main one being that the fabric I'm working with is really thick.
1:00:37 It's like in a pretty thick coating fabric and I did
1:00:41 not think that the uh belt would slide through mine that easily.
1:00:45 That being said, um we did add a little bit of length to your pattern piece,
1:00:49 but if you feel like you're working with a really thick fabric,
1:00:51 maybe like a tweed or a heavy wool or a leather,
1:00:53 you might want to add a little length to your belt loop as well.
1:00:56 Truly, this is where design comes in or functionality.
1:00:59 And I felt like this fabric required a larger belt loop.
1:01:01 Sometimes you have to make that choice
1:01:02 depending on the fabric you're working with.
1:01:04 So, here's how we're going to work them.
1:01:06 We're basically going to just fold them in half
1:01:08 with the right sides facing and pin all the way down.
1:01:10 It's pretty simple.
1:01:32 Okay.
1:01:32 Now let's stitch.
1:01:34 Now, the seam allowance on this is quarter of an inch.
1:01:55 Now, after you've stitched,
1:01:56 I like to go through and trim away about half of the seam allowance here.
1:02:00 Um, give you that so that you got a little something to hang on to.
1:02:03 Now, I'm going to use a loop turner,
1:02:05 which is an instrument that I have laying around.
1:02:08 It's silver.
1:02:09 Looks like this.
1:02:10 It has a little hook like this.
1:02:13 So, basically, what you do is you insert the hook and you grab onto
1:02:18 a bit of the fabric and you close that little See that little hook there?
1:02:23 This one is going to be a little trickier.
1:02:27 Now, if you're working with a thick fabric, this could be hard,
1:02:29 but you're basically going to pull and it's going to pull it right side out.
1:02:33 So, this is what mine looks like.
1:02:39 Like this.
1:02:40 And you can kind of roll it out and then
1:02:42 give it a good press so it's nice and flat.
1:02:44 But this is definitely a workable belt loop.
1:02:46 And now I'm going to go ahead and do this on the other one.
1:02:49 So, this is my pressed belt loop.
1:02:51 And I actually went ahead and folded the ends under
1:02:53 about a/4 of an inch and pressed those as well.
1:02:56 Now is the part where we're going to stitch them on.
1:02:59 We're doing this before the lining is sewn on cuz
1:03:01 I want to sew them directly onto the outer shell,
1:03:03 but I don't want them to go through the lining.
1:03:05 Now, this is my side seam,
1:03:08 and I'm going to place this directly over the side seam,
1:03:13 and I'm just going to pin on the bottom here.
1:03:19 This is kind of tricky because it's going to be thick.
1:03:22 It might be kind of hard to sew on depending
1:03:24 on what kind of fabric you are using, but take your time.
1:03:28 It is a very functional part of the coat.
1:03:30 If you've ever worn something that has a waist tie,
1:03:34 you know they're always falling off.
1:03:35 So, I like to include them.
1:03:42 And also, this is another thing,
1:03:43 but like you can also like choose to like push it
1:03:45 like slightly closer together so that it gaps a little bit.
1:03:48 That makes it even easier to like slide a belt loop in.
1:03:52 This is a little thing that you could choose to do for preference.
1:03:55 I know some people are like really function over fashion and I get that.
1:04:01 Um it just depends on what I'm doing and what I'm making on whether
1:04:04 I choose to be nice to myself on something I'm making and be functional.
1:04:09 Okay, I have got this kind of pinned on here.
1:04:11 I'm going to go ahead and take this over to the machine.
1:04:12 Now, we're basically just going to do a little line stitch here.
1:04:15 Typically, there's a setting on your sewing machine
1:04:16 called a bar stitch or a bar tack.
1:04:18 And it's going to be like basically like a button hole looking line.
1:04:21 They use that a lot,
1:04:22 but not everybody's machine will go through this much fabric.
1:04:25 So, you can do a little straight stitch and it will be just fine.
1:04:30 Okay.
1:04:31 Now, I'm just going to do a little stitch here.
1:04:34 I am going to go over it a couple of times so
1:04:38 that I'm going to try to do it as neat as I possibly can.
1:04:42 You might have to like walk your sewing machine foot
1:04:47 for those of you who have a lot of fabric.
1:05:01 Okay.
1:05:04 And now you're going to do the same to the bottom.
1:05:06 And then repeat this to the other side.
1:05:08 Okay.
1:05:09 Let's talk about the collar.
1:05:10 You should have cut two of these.
1:05:11 And if you're working with a lighter weight fabric,
1:05:12 you would have used a little interfacing on yours.
1:05:15 So, I'm just going to pin these together at the sides and along the top up here.
1:05:20 Mine does match up.
1:05:21 I promise.
1:05:22 It's just this wool fabric that gets a little discombobulated.
1:05:47 Okay, now let's stitch.
1:05:50 Okay, starting at the bottom here, I'm going to work my way up towards the top.
1:05:55 I'm stopping half an inch away, leaving the needle inserted.
1:05:59 And I'm going to swivel the fabric with a presser once I raise the presser foot.
1:06:02 And I'm going to work my way along the top of the collar now.
1:06:14 Stopping half of an inch away.
1:06:17 And now I'm going to work my way back down.
1:06:22 Just like that.
1:06:24 Now I'm going to take these pins out.
1:06:26 And then I am going to trim away about half the seam allowance.
1:06:29 And I'm going to turn it right side out.
1:06:31 I'll show you.
1:06:33 Now, whenever you're working with a collar,
1:06:35 I like to take half of the seam allowance away.
1:06:44 especially in the corners cuz you want this to be nice and sharp.
1:07:00 Now, I'm going to turn this right side out.
1:07:04 You're going to want to have like the end
1:07:05 of a paintbrush or something that's not super sharp, but pointed.
1:07:08 I'm going to use these shears.
1:07:09 Don't do this.
1:07:10 Um, I'm just going to be very ginger as I do it,
1:07:13 but you want to use something that's less sharp.
1:07:15 And you want to really press that out nice and pointy.
1:07:19 And then we're also going to press this, which will help, too.
1:07:22 Um, and then you can top stitch if you like,
1:07:24 but for me, I'm starting with just pressing it out nice and pointy.
1:07:29 And now I'm going to go give this a press at the iron.
1:07:32 Okay.
1:07:32 So, now I'm going to pin my collar to the coat here.
1:07:35 I've marked the center point of my collar.
1:07:37 I pinned both layers together.
1:07:38 And this is the very center.
1:07:40 Now, I'm just going to pin it facing
1:07:42 down towards the coat with right sides facing.
1:07:45 Um, both of mine are the same and yours might be as well.
1:07:48 Um, but I am just going to start at the center and work my way around.
1:08:33 Now, it's important to know they don't go all the way to the very center front.
1:08:37 uh because the coat overlaps in the front.
1:08:39 Obviously, we'll talk about buttons and all of that soon,
1:08:42 but it doesn't go all the way to the center front.
1:08:44 So, if yours has a gap, that's normal.
1:08:48 It should.
1:08:57 Okay.
1:08:58 Now that I have got this pinned in here, uh you can do one of two things.
1:09:02 You can do a little security stitch here at less than 1/4 of an inch,
1:09:05 like just at the very edge if you want to.
1:09:08 Um, I'm still going to use pins.
1:09:10 I think it's probably for the best.
1:09:13 Okay, now my table is a mess and for that I'm going to apologize in advance,
1:09:17 but I had to pull the camera out so you could actually see what I'm doing.
1:09:21 So, I have the coat laid out here, uh,
1:09:23 good side up, and I'm just going to take the lining,
1:09:26 and I am going to be basically pinning my lining to the outer shell here.
1:09:32 Um, we're sandwiching the, uh, collar in between the lining and the outer shell.
1:09:37 Um, and we're going to start up here at the neckline,
1:09:39 and I'm just going to go all the way across here,
1:09:41 pinning them together at the neckline.
1:09:44 Um, basically, this is us attaching the lining to the outer shell.
1:09:48 And you're going to need a lot of pins for this.
1:09:50 So, make sure that you're stashed up before you start pinning.
1:11:26 Now that I have pinned all of this together all the way around,
1:11:29 we are going to sew.
1:11:30 It kind of doesn't matter where you start
1:11:31 sewing because we're basically sewing the entire thing together.
1:11:34 Kind of like a pillow case.
1:11:35 So, let's go ahead and start stitching.
1:11:38 Okay, this is the part of the process
1:11:39 where we're going to practice a little patience.
1:11:41 I'm going to zoom out a little here so you can see like actually what I'm doing.
1:11:44 So, at this point, I have the whole coat up here.
1:11:46 Everything's pinned together the whole way around.
1:11:48 I'm just going to pick a corner and start sewing.
1:11:51 This is my bottom edge and this is my front.
1:11:53 It doesn't really matter where you start
1:11:54 because it's basically sewing the whole way around.
1:11:57 Um the entire thing is at half of an inch which is important to note.
1:12:02 Now we just start making our way around.
1:13:20 Okay, now I'm at the very end here and I'm just going to round off.
1:13:24 See?
1:13:24 Got a nice like perfectly got a nice perfect square here stitched.
1:13:29 And now I'm going to take this over to the table and remove all of the pins.
1:13:33 Okay, now that everything is sewn, I've taken all the pins out.
1:13:36 I'm going to have us go through and trim away half the seam allowance,
1:13:39 especially on the center front all the way up to the neckline.
1:13:44 So, when we turn this right side out,
1:13:46 it's just going to make it really uh clean and polished.
1:13:49 Like right now, I think that there's a little bit too much extra seam allowance.
1:13:53 But I also sometimes feel if I leave you too much
1:13:55 or if I leave you with not enough seam allowance while sewing,
1:13:58 I think it makes it a really hard pattern.
1:14:01 And like this is not a hard pattern.
1:14:02 It just takes a lot of steps.
1:14:04 Um, and I want beginners to be able to sew this pattern.
1:14:08 So, um, that's why I give you guys a little extra seam allowance.
1:14:11 Just makes it easier for the user.
1:14:13 I'm also trimming away about half up here at the neckline.
1:14:17 Be really careful that you don't cut anything that you're not supposed to cut.
1:14:21 This can be a breaker.
1:14:23 Um I have absolutely when trimming away seam allowance
1:14:26 before accidentally trimmed into my lining cuz the lining fabrics
1:14:29 are usually a little bit more lightweight and they
1:14:32 like are a little flimsier and get in the way.
1:14:34 And I've cut through the lining before.
1:14:36 So make sure that when you are cutting you do not cut through your lining.
1:14:40 It's time to turn this right side out.
1:14:41 I've pulled the camera out a little bit so you can see more of the table.
1:14:44 This is why we left this hole.
1:14:46 Okay.
1:14:46 Now, I don't want you to be like aggressive as you're pulling it right
1:14:50 side out because I don't want you to rip the hole that we left here.
1:14:53 These stitches are important.
1:14:55 Um, I'm just going to slowly but surely start
1:14:58 to pull the outer layer of the coat piece by piece.
1:15:03 Like I'm going to pull the sleeves through first.
1:15:06 I'm just reaching into that hole we left
1:15:07 in the lining and slowly um reaching down through,
1:15:13 grabbing and pulling it right side out.
1:15:17 Now, like I said, I want you to like slowly ease it out.
1:15:20 I'm just kind of pushing from one side and like slowly leading it out
1:15:25 of that hole that we left in the lining in where the waist seam is.
1:15:33 Now, one thing to note as you push your corners,
1:15:35 make sure that you get them nice and pointy.
1:15:38 Um, we'll get to that in a second,
1:15:39 but that is a note that you should think about as you're doing it.
1:15:43 So, I have most of my coat right side out now, which is nice.
1:15:51 Have the outer shell.
1:15:52 Okay, now I'm going to go in and I'm going to press those corners out.
1:15:56 Like I said, I'm using a pair of scissors.
1:15:58 Um, if you've never done this before, don't use a pair of scissors.
1:16:00 use like a pencil or uh the end of a paintbrush.
1:16:03 But you're just going to kind of press
1:16:05 these corners out nice and pointy at the bottom corner.
1:16:09 And then also up here where the center
1:16:14 front is like this is our collar right here.
1:16:17 And then this is our center front.
1:16:18 You want this to be nice and pointy, which that looks really good.
1:16:21 I'm going to do the other sides now.
1:16:23 And then afterwards, I'm going to go press everything flat,
1:16:28 which if you don't even know where to start with that, it's kind
1:16:31 of the same exact area that we stow that we just sewed together.
1:16:36 Um, you're basically going to.
1:16:50 So, when I say press everything flat, this is now the center front, okay?
1:16:54 Like, and when you wear it,
1:16:55 it's going to be flat like this, but it needs to be pressed flat.
1:16:59 So, you're going to go all the way around the outside
1:17:00 edges and like kind of I like wiggle them together like this.
1:17:03 And then I press them flat with the iron.
1:17:05 And I work my way around the whole coat.
1:17:08 Okay.
1:17:08 Now that we've given everything a good press,
1:17:10 see how beautiful the edge of this is now that I have pressed it flat.
1:17:13 It took me a little while.
1:17:14 It definitely does, especially around this like collar area,
1:17:17 but it's going to be gorgeous when it's done.
1:17:19 It's time to address the sleeves and like kind of hemming them out.
1:17:22 So, the first thing I'm going to have us do is we're going to reach
1:17:26 inside of this hole here and I'm going to pull through the lining of the sleeve.
1:17:33 So, this is my sleeve lining.
1:17:34 As you can see, there is the seam right here.
1:17:37 Okay.
1:17:38 Now, I'm going to reach through and I'm
1:17:40 going to pull through the actual outer sleeve.
1:17:48 And I'm going in through that waistband hole that we left.
1:17:51 Now, this is my outer sleeve.
1:17:54 They go like this.
1:17:56 The first thing we're going to do is we're going to line up
1:17:57 these seams here so that we can make sure that the arm isn't twisted.
1:18:01 This is where it gets a little tricky.
1:18:03 So, circle here, right?
1:18:04 This is the wrist hole.
1:18:05 We have a circle here.
1:18:07 I am going to make sure that the right sides are facing like this.
1:18:11 Okay.
1:18:11 I'm going to start off by placing the inseam
1:18:13 of the outer shell and the inseam of the lining.
1:18:15 See, both of those are here.
1:18:16 I'm going to place those together with right sides facing.
1:18:19 And I'm going to pin these together.
1:18:25 And I'm going to work my way around.
1:18:26 It's just one layer of the lining, one layer of the outer shell here.
1:18:35 And I'm going to show you what it looks like
1:18:37 when it's done so that you maybe have a better idea.
1:18:39 I know that this part is going to confuse some people.
1:18:42 And if you don't if you get into this and you feel like you can't do it,
1:18:46 you could easily just turn it right side out and do
1:18:48 a little hand stitching and stitch the sleeve lining to the sleeve.
1:18:52 It's also fine.
1:19:31 Okay, now I have them pinned together.
1:19:33 Do you see what it looks like here?
1:19:34 They're pinned together with the right sides facing.
1:19:37 So, it's like when I sew,
1:19:38 I'm going to sew the one layer of the lining to the sleeve just like this.
1:19:42 And I'm going to sew all the way around.
1:19:43 It'll make more sense when I'm at the sewing machine.
1:19:45 So, let's go ahead and make our way over there.
1:19:47 Take your time with this.
1:19:49 It's very you're doing just like a little bit of space at a time.
1:19:52 So, I'm inserting my sleeve here on one side.
1:19:55 I'm making sure my lining isn't twisted.
1:19:57 And I'm going to do a little back stitch to start.
1:20:00 So, I'm going to work my way around the sleeve.
1:20:03 And as I do it, I'm going to kind of like pull a little more down.
1:20:07 And I'm going to like flatten out the lining here.
1:20:11 And I'm going to do it again.
1:20:16 This is a part of the jacket that I think is very tricky,
1:20:19 but like I'm hoping that this tutorial is helpful.
1:20:32 The worst part is all of the um random pens.
1:20:37 They kind of hurt.
1:20:38 Okay, I'm just making my way around slowly.
1:20:47 You just always want to make sure you're only sewing through the ones
1:20:51 you've pinned and like you didn't catch the other side of it on accident.
1:21:02 Okay.
1:21:04 And now I'm going to clip the threads.
1:21:12 And I'm going to take it over to the table
1:21:13 so I can show you why we did it this way.
1:21:21 Okay.
1:21:22 So, this is why we did it this way at the moment.
1:21:24 Let me show you the anatomy of the coat here.
1:21:27 So, this side I haven't done yet, right?
1:21:29 This sleeve is not finished.
1:21:30 So, this is all right side out.
1:21:32 But remember, we pulled the sleeves through the sleeve lining here.
1:21:35 Now, what I'm going to do is I'm just going
1:21:37 to push them back inside of the sleeve lining here.
1:21:42 This little section here in the center.
1:21:43 Now, this is my favorite way of doing it.
1:21:46 I like to now reach my hand into the sleeve.
1:21:50 Okay?
1:21:51 And I will pull it out like this.
1:21:54 So you can see the fur is in here.
1:21:56 Now, now let me flip the coat over and go to the outside of the coat.
1:22:00 I'm going to now reach my hand in the outside.
1:22:04 And I am just going to pull the sleeve out.
1:22:08 Correct.
1:22:10 This is what it will look like.
1:22:12 You do need to press it.
1:22:13 But now we have a lining inside of the sleeve just like this.
1:22:16 And also it's important, put your arm in.
1:22:18 make sure that the lining is not twisted.
1:22:20 Um, but this is my favorite way of doing it.
1:22:22 It's the best way when you can line up that underarm seam like
1:22:25 we talked about this one and it just makes this lay really really beautifully.
1:22:29 Um, but that is how we do the sleeve lining.
1:22:32 Um, if you need help with this, watch it again.
1:22:34 Watch it in half speed.
1:22:36 Um, this is the trickiest part of the jacket.
1:22:38 Um, but once you've done this side like this, give this a good press.
1:22:42 Um, you could also do a little hand stitch here at the uh underarm seam.
1:22:47 Some people will wrap the uh lining to the seam allowance of the underarm seam.
1:22:51 It just kind of keeps everything in place.
1:22:53 And then we're going to repeat this to the other side.
1:22:55 Now, we are going to close up this seam here.
1:22:58 This is the waist seam.
1:22:59 So, you can do this one of a few ways.
1:23:01 Uh you can do a little hand stitch, which is what I'm going to do,
1:23:04 but you could easily just push them together and pinch
1:23:07 them and then stitch across like a top stitch.
1:23:09 A lot of people do that.
1:23:10 Um but I'm just going to do a quick little hand stitch.
1:23:14 Forgive all of the loose fur all over this.
1:23:33 And this is just going to close up the gap of the center back of the coat.
1:23:46 So go ahead, make your way across and close up the center back of the coat.
1:24:33 We add in the button holes.
1:24:35 I'm actually including a button hole tutorial as part
1:24:38 of the landing page for this um because it's a lot to explain in one video
1:24:42 and this tutorial is really just about the coat,
1:24:44 but we are going to add our button holes.
1:24:46 I'm just now kind of cutting mine open.
1:24:48 Um but in my other tutorial that is included with this pattern.
1:24:51 It's on the landing page cuz I think
1:24:52 it's kind of important to make a beautiful coat,
1:24:54 I kind of talked to you a little bit
1:24:56 more in detail about how to make the button holes,
1:24:57 what settings to use, all of that jazz.
1:25:00 So, now that I have undone my button holes,
1:25:04 I'm just going to go ahead and attach my buttons.
1:25:06 These are the buttons that I'm going to be using.
1:25:09 They have this like really beautiful etching in them.
1:25:11 I think they're like really, really pretty.
1:25:13 I love the kind of roundness of them.
1:25:14 And on this coat with that dark fur, going to look so chic.
1:25:18 So, I'm going to go ahead and attach my buttons.
1:25:35 is left to do is to work on our waist tie.
1:25:38 You should have cut two of these on the fold.
1:25:42 So, I'm just going to pin these together with right sides facing.
1:25:48 Basically, we're going to sew these together all the way around and leave
1:25:51 probably like a seven to eight inch gap uh in the center back.
1:25:56 And that's just going to be our space to turn them right side out.
1:26:00 Um also, if you like a longer waist tie,
1:26:03 before you cut out the waist tie, make sure that you cut it a little longer.
1:26:06 You can always buffer it in.
1:26:08 That's where design comes in.
1:26:09 That's the beauty of having uh the opportunity to design something for yourself.
1:26:45 Okay.
1:26:46 I'm gonna take this over to the machine and sew.
1:26:49 Okay.
1:26:49 Now, I'm gonna actually start sewing the waist belt in the middle
1:26:51 of this because I want to be able to turn it right side out.
1:26:54 Um, so if this is my middle point right here,
1:26:57 I'm starting a few inches away from that.
1:26:59 This is at half of an inch also.
1:27:01 And now I'm just going to sew all the way around.
1:27:03 And when we stop, like I said, if this is center,
1:27:06 I'm going to stop the same distance from here on the other side.
1:27:08 That gives us about an 8 or 9 in gap to turn the whole thing right side out.
1:27:12 Kind of like how we did with the lining uh at the waist seam.
1:27:43 is going Heat.
1:27:45 Heat.
1:28:08 Heat.
1:28:25 Heat.
1:28:32 Wow.
1:29:00 Heat.
1:29:01 Okay, now I'm making my way towards where we started.
1:29:05 This is where we started here.
1:29:06 And like I I'm going to do a little back stitch here,
1:29:09 leaving myself a gap to turn it right side out.
1:29:12 Let's take this over to the table.
1:29:14 Okay, just like we did in a lot of the other things,
1:29:17 we have to cut away about half of the seam allowances here.
1:29:20 And then anywhere that you have a point,
1:29:22 you want to go ahead and snip off the edge here.
1:29:24 Makes it easier and prettier when you turn it right side out.
1:29:28 Now, the only place I will tell you not to trim
1:29:30 away half the seam allowance is uh where the opening is.
1:29:33 I would leave a little bit of seam allowance there.
1:29:36 It just makes it easier to um hand sew it closed.
1:30:06 I hate the scissors.
1:30:10 Okay, time for us to turn this right side out.
1:30:13 Uh, for this I'm going to use the end of a paintbrush.
1:30:15 Uh, just cuz it's going to be non-intrusive.
1:30:18 But so this is the opening I left.
1:30:19 See how I left a little bit of seam allowance here?
1:30:21 I cut everything away and then I kind of just like left some little notches.
1:30:24 So, this is longer.
1:30:25 It's just going to make it easier to sew it close.
1:30:27 I'm going to start at one end.
1:30:28 My favorite way of doing something that's
1:30:30 really long like this rather than using
1:30:31 a turner is I will literally just take the This is a paintbrush like I said.
1:30:35 Um, and I kind of like push the fabric down over top of the paintbrush.
1:30:40 And then I just kind of slowly work it down.
1:30:44 And it takes a little longer on a fabric that uh doesn't glide like a wool,
1:30:51 but this is the best way of doing it.
1:30:53 You just kind of like slowly pull this part
1:30:55 down as you hold onto the paintbrush and continue
1:30:58 to pull the fabric down over top
1:31:00 of the paintbrush until you get to this opening here.
1:31:13 Making sausage.
1:31:16 Mhm.
1:31:19 Now, as you get to the end here,
1:31:23 I can see it's starting to poke the end through.
1:31:28 I'm going to pull it the rest of the way out.
1:31:31 You're going to kind of have to do this side at a time.
1:31:33 So, this side is now out.
1:31:34 And now what I can do is I can
1:31:35 just push the paintbrush back down through to the opening.
1:31:45 And then we can just do it again on the other
1:31:46 side to turn the whole thing right side out.
1:31:49 So now I'm going to go in from this side.
1:31:52 Yep.
1:31:53 Okay.
1:31:53 Now that we are gonna The next step is going to be to iron it.
1:31:58 But before you do, I'm putting the pencil back in.
1:32:01 And well, this is a paintbrush.
1:32:03 I'm sorry.
1:32:04 I'm putting it back in and I'm pushing the points out.
1:32:07 It's really important that you push these out.
1:32:09 It's what going to be what makes it
1:32:11 all feel really uh finished and like professional.
1:32:14 So now after you've done this on both sides,
1:32:16 let's take this over to the ironing board and give everything a good press.
1:32:22 Now I have gone ahead and pressed this.
1:32:24 See how it lays a lot flatter?
1:32:26 Now the very last step is just to roll your seam allowances in.
1:32:29 And then we are going to do a little either
1:32:31 top stitch or we're going to do a little hand stitch,
1:32:34 something to secure these in.
1:32:36 But go ahead, stitch this closed.
1:32:38 Attach your belt to the jacket by putting
1:32:40 it through the belt loops that we attached earlier.
1:32:42 And then your winter crest coat is finished.