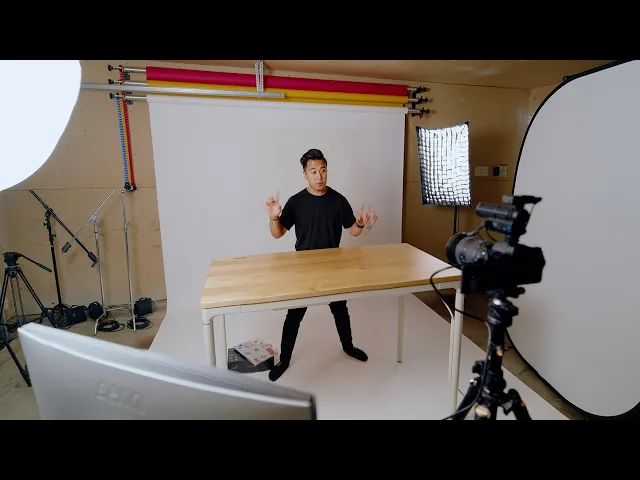
Creating a Studio in My Garage - Here's What I Got
Sidney Diongzon
0:00 This is so cool.
0:02 So, this is actually my personal garage and I'm
0:04 currently converting it into [music] an actual photography video studio.
0:09 In fact, I'm filming a series of documenting the entire process
0:12 of how I'm going to convert my garage into a studio.
0:14 In the first episode,
0:15 I showed you the backdrops and lights that I'm using and in today's episode,
0:19 I want to show you three more products.
0:21 This desk that I'll be using to film my product review videos,
0:24 this really cool monitor from BenQ that I'll be using on Video
0:27 Village so that I can see myself filming these product review videos.
0:30 And then we're going to film my first unboxing in my garage
0:33 studio of a mic that I'll be using in my studio.
0:37 So, hold on to your butts.
0:38 Let's begin.
0:39 First of all, shout out to Autonomous for sponsoring this video.
0:42 In fact, they are providing this beautiful desk for my garage studio.
0:46 It is unlike any other desk that I've ever used because
0:49 you can use your hand to lower it or raise it higher.
0:57 So cool.
0:58 This is the Autonomous Smart Desk Levitate 2 because it levitates.
1:02 But this doesn't look like your typical smart desk.
1:05 This actually looks like beautiful furniture
1:07 that you would use in your own home.
1:09 And that's what I wanted.
1:09 I wanted a familiar, warm, beautiful-looking desk.
1:13 The surface is actual wood and what's really
1:15 cool is that in this section over here,
1:17 the edge is actually tapered off so that it
1:19 feels comfortable when you're leaning your arms on the desk.
1:22 But it has a sensor over here where if you show your palm and push it down,
1:26 it will lower the desk.
1:27 Or if you raise your palm a little higher, it will raise the desk.
1:30 There's also a plus and minus button on the bottom to raise
1:33 and lower the desk if you prefer to do it that way.
1:35 You can also program two different heights
1:36 for this desk for sitting and for standing.
1:38 But what I really love about the Smart Desk Levitate 2 is
1:41 that there's a console on the bottom where it hides all the cables.
1:45 In fact, there's an outlet where you can plug
1:47 in items like your monitor or your computer or your speakers.
1:49 You can plug whatever you want but also hide it because
1:52 the purpose of this desk is for it to look minimal.
1:55 Autonomous also sent over the Desk 5 Core which is
1:58 a smaller desk that I'm using for my closet studio.
2:01 There's no levitating hand gesture feature,
2:03 but there are controls to raise and lower
2:05 the desk as well as program different [music] heights.
2:07 It's a really solid, good-looking desk.
2:09 I love using it for my editing space.
2:11 If you want to check out the Desk 5 Core or the Smart Desk Levitate 2,
2:14 then make sure to check out the links in the video description down below.
2:17 The next thing I want to show you is this really awesome monitor
2:20 from BenQ which is sitting on my utility cart that I'm using as Video Village.
2:25 We'll talk about that cart in another video cuz that's a really cool cart.
2:28 But this is the BenQ PD2730S, a 5K 27-in Thunderbolt designer monitor.
2:35 Now this monitor is so cool because not only does it have 5K resolution,
2:40 but the colors look so good.
2:42 You got 98% P3, 100% Rec.
2:44 709, and 100% sRGB.
2:47 On the back you've got an HDMI 2.1 port,
2:49 DisplayPort 1.4, two Thunderbolt 4 ports, a USB Type-C port.
2:54 On the bottom you have an additional USB-C port.
2:56 You've got three USB Type-A ports and a headphone jack.
2:59 The monitor has 400 nits which is plenty fine
3:02 for in my closet studio and for my garage studio.
3:05 But again, what I love the most about this monitor is the well,
3:08 the 5K resolution and the colors.
3:10 Like the colors look so good.
3:12 Like right now, my Sony a75 is plugged into the monitor with an HDMI cable
3:16 and I'm standing about 5-6 ft away
3:18 from the monitor and it looks so good, so clear.
3:21 It's awesome that I'm using this as my monitor for Video Village,
3:24 but I also do love that I get to use this monitor for when I edit my videos.
3:28 I might want to get two now.
3:29 Leave one here for Video Village and one to keep in my studio.
3:32 And so, that's my monitor and now let's go film this unboxing.
3:38 [music] So, this is the Lewitt Ray,
3:41 a studio mic that has autofocus for your voice.
3:47 [music] It's cool.
3:47 But first, let's unbox it.
3:48 All right, got my camera rigged up on top.
3:50 I can see it on my monitor.
3:51 So cool.
3:52 Here we go.
3:55 Not going to lie, like it's actually really nice
3:57 to have a space this big to film my videos.
4:00 Awesome.
4:00 All right, we've got our documents over here.
4:04 We got this nice-looking pouch which I'm assuming is to store the mic.
4:08 Very nice.
4:09 And let's lift this up.
4:11 Ooh.
4:13 And here it is.
4:22 Aw, it's so small.
4:25 Looks so cool.
4:26 Hold on, got to do this.
4:28 Ah, satisfying.
4:29 I don't know if you see it, but look, it just looks so premium.
4:36 [music] Metal housing.
4:37 This looks great.
4:37 There's an XLR input on the bottom.
4:40 Oh man, I'm excited about this.
4:41 All right, let's see what else we got.
4:44 All right, we got the windscreen.
4:45 Put that on top of the mic.
4:48 All right, so this is our pop filter.
4:50 Let me go to top camera.
4:51 Pop filter right over there.
4:52 I'm assuming this is the mount.
4:55 Yep.
4:56 Aw, that is so cool.
4:59 And then a Velcro strap to uh tidy up your cable.
5:03 I think that's uh that's it.
5:06 And without reading the instructions, we're going to assemble this.
5:11 There's the pop filter.
5:16 Oh cool, just snaps into place.
5:17 Okay, so the pop filter snaps into place.
5:19 That's nice.
5:20 I guess I have the option to use the windscreen or not,
5:22 but uh I guess we're not going to use the windscreen.
5:24 And the pop filter is meant to remove like the p p p sounds of of your voice.
5:30 So, we'll just use the pop stand and then with the XLR cable,
5:34 just plug it into your audio recorder.
5:36 So, that's the unboxing, but we're not going to stop right there.
5:39 I want to hear what this mic sounds like.
5:41 Okay, so we got our audio recorder.
5:43 I'll be using the Zoom H1 XLR.
5:46 Looks like I could just plug it straight into uh my Zoom.
5:50 Or I can use a XLR cable which I guess I'll just do anyway.
5:53 And then plug that guy.
5:55 Okay, we got phantom power turned on.
5:59 Ooh, okay.
6:00 So, there's a sensor right over there.
6:01 I don't know if you see it.
6:02 And there's my aura distance, I guess.
6:05 All right, here we go.
6:06 Let's Let's just record.
6:07 Okay, so I'm talking with the Lewitt Ray and I'm
6:11 pretty close to the mic, about maybe 5 in.
6:15 But if I'm away from my mic over here which is about 15 in, the sensor is
6:21 going to focus in on my voice and make
6:24 my voice sound clear even though I'm far away.
6:27 That's what I mean by auto-focusing your voice.
6:31 And so, if I walk up closer, it's going to use the sensor to like
6:34 recalibrate and make my voice sound pretty good.
6:38 And if I'm away from the mic, the sensor is going to see that and it's
6:41 going to recalibrate and auto-focus on my voice.
6:45 That's crazy cool.
6:47 And the best part is that I don't have to make it even sound good.
6:50 Like it does it for me and I I love that.
6:53 I need to make a full-on video about this mic.
6:56 Like the Lewitt Ray, oh man, this this is a game-changer, seriously.
7:00 And I guess this wraps up this episode
7:02 of how I'm converting my garage into a studio.
7:05 If you want to check out the gear that you saw
7:07 in this video from my desk to my monitor to this awesome mic,
7:11 then you can check out the product links in the video description down below.
7:14 But guys, I'm getting really hyped for [music] this space.
7:17 Like this is pretty cool.
7:26 [music] [music] [music]