How Was Bread Made 200 Years Ago?
Townsends
0:00 What if it took two or three days to bake
0:03 a loaf of bread from the beginning to the end?
0:06 Recently, we did an episode on baking potash cakes.
0:10 And potash cakes were specifically to sort of fix this problem.
0:15 If we had a visitor that came to our house,
0:17 but we didn't have our bread ready to go,
0:19 and bread could take a while in the 18th century,
0:22 then we could make potash cakes to feed
0:24 them right away with something that was bread-like.
0:27 This whole concept came from Margaretta Curly's article in 1799,
0:32 where she describes this special way of baking, at least for that time.
0:37 But the wonderful thing about her letter is
0:41 there was a little extra part at the end.
0:44 This part of the letter talks about baking bread if you don't have yeast.
0:49 This could be a real problem in the 18th century.
0:51 Today, we get yeast from the store.
0:53 It's available to us all the time.
0:55 We have a dried form of it.
0:56 But in the 18th century, they didn't have that.
0:59 Yeast came either from the brewer or from your local baker, and you bought it,
1:04 and it was in a liquid form that didn't last for very long.
1:07 Margaretta Curly talks about this problem.
1:10 She says, "Yet there is a method
1:12 of preparing a fermenting mixture with which the Long
1:16 Island women are well acquainted that I
1:18 will take the liberty of mentioning to you.
1:21 It is to take as many hops as may be held between thumb and three fingers,
1:27 put them into a pint and a half or a quart of water,
1:30 and boil them together." And then she goes on with more directions.
1:35 She's talking about making a mixture that will capture the wild
1:39 yeast in the air so that you can use it for baking.
1:43 Now, this is something that we do quite often today.
1:46 People who experiment with sourdough bread
1:48 sometimes kind of capture their own yeast.
1:51 And the great thing about yeast is it's in the air around us all the time.
1:56 We have yeast on our hands, it's on fruits and vegetables out in the fields.
2:01 We have yeast available to us,
2:03 yet in the 18th century they did not even know what yeast was.
2:08 They hadn't even really got the whole concept of yeast.
2:11 So, this idea that we could just capture it
2:13 in the air was something that was very new to most people.
2:18 In fact, if you look in 18th century English cookbooks,
2:21 you will find some recipes that say how to make yeast,
2:26 but those recipes always start with take some yeast.
2:30 They're not recipes for making yeast,
2:33 they're recipes for making more yeast from a little
2:37 bit of yeast that you might already have.
2:39 But, this recipe actually tells us how to capture wild yeast,
2:43 basically making yeast from nothing.
2:46 And this is extremely rare in the time period,
2:50 at least for people writing it down.
2:52 People may have been doing it and were doing it for hundreds of years.
2:55 Where did bread come from 200 years ago or 500 years ago, for that matter?
2:59 And where did beer come from?
3:01 Well, it came from yeast from the air that was kind of worked on.
3:05 There's one other recipe that I found in the 18th
3:08 century for this, and it's also an American recipe.
3:11 It comes out of this book that is a New Jersey Farmers Book,
3:17 and there are a few recipes in the back.
3:19 And he explains another method very similar to this, where
3:22 we take wheat bran and we boil it,
3:25 and then we add some things like ginger and molasses to it,
3:30 and we let it set, and it starts to bubble all on its own.
3:34 That's the yeast taking off.
3:36 So, today we're going to be doing this grand experiment,
3:39 where we're going to use Margarita Curly's recipe,
3:42 maybe a little bit of this one, too,
3:44 and we're going to make bread without yeast.
3:47 So, here's Margarita Curly's recipe for making your own yeast.
3:51 Take as many hops as will be held between thumb and three fingers.
3:55 Put them into a pint and a half or a quart of water and boil them well together.
4:00 If you have a few apples or a pumpkin in the house,
4:04 cut a few slices of either of these and throw in.
4:07 It will be all the better.
4:09 Then pour the liquor off or strain it through
4:12 a coarse cloth and add three or four spoonfuls
4:15 of molasses and stir in just as much flour
4:20 as will mingle with it to the consistency of thin batter.
4:24 Set the whole in the corner of the kitchen fireplace
4:27 or in any temperature of moderate warmth until a fermentation takes place,
4:32 which will happen in a few hours.
4:34 Then mix it up with your flour and knead it
4:37 up into your dough as in common cases of bread making.
4:41 The key to this recipe is the hops at the beginning.
4:44 We could just basically mingle some flour with some slightly
4:51 warm water and set it aside in a bowl and wait.
4:56 That could take two hours or two days for it to start to do something,
5:02 but it will do something eventually.
5:05 More than likely though, it will start to do something bad.
5:08 So not only will the yeast start to take over
5:10 and start to grow in our little bowl of flour and water,
5:14 but other things will start to grow in there as well.
5:17 Basically, bacteria.
5:19 Now the bacteria may be good, it may be bad,
5:21 more than likely it's going to create a sour
5:23 taste and that's where sourdough kind of comes from.
5:27 It's sometimes caused by bacteria.
5:31 What the hops do here is it keeps that from happening.
5:35 So when we boil the hops, we're starting to create a lightly hopped water.
5:41 And the hops do two things.
5:43 It has some enzymes and it starts to I think
5:46 break down things like starches and puts them into sugars,
5:50 so the yeast can work on them.
5:52 But, the more important thing is is it suppresses
5:55 the growth of bacteria while it lets the yeast grow.
5:59 If we have too strong of a hop mixture here,
6:02 it will even suppress the yeast and basically nothing will happen.
6:06 We don't want that.
6:07 So, we want some lightly hopped water.
6:10 We want to let it get cool.
6:12 We don't want it to be so hot that we kill any yeast.
6:14 Then we can add in our flour.
6:17 Margarita Curly just talks about flour.
6:19 Here in this other book,
6:21 he specifically mentions rye and rye flour is one of the best
6:25 flours to use for this capturing this wild yeast basically.
6:29 The yeast is probably on the flour itself.
6:32 It might be coming from the air, might be coming from the flour,
6:35 or just about anything else in your kitchen basically.
6:38 But, if we take this hopped water and we add our molasses,
6:43 which is the sugars that that will feed the yeast as well as the rye flour,
6:48 then it will start to do its thing.
6:51 It will Now, she says 2 hours.
6:54 It's more than likely going to take a lot more time than that.
6:58 Um I would say at least in cool weather like this, might take half
7:01 a day or even 2 days for it to really start to look like something.
7:06 Let's work on our hops water.
7:08 We need about a quart of water and let's have that boiling.
7:12 We'll take our hops flowers.
7:14 We don't need very many, about an ounce or so.
7:16 Five or six is probably enough.
7:19 Put them into our boiling water and let that boil approximately 10 minutes.
7:24 And then, take that off the fire and let it cool.
7:27 Once our water is cooled off, we can stir in a little bit of molasses,
7:31 which she calls for and also the other recipe from a New Jersey.
7:35 We just need maybe a tablespoon of molasses.
7:38 Even a teaspoon will do.
7:39 We don't need a whole bunch of sugar in here.
7:43 She kind of overdoes it in her recipe.
7:45 Once that molasses is stirred in, we can also stir in our rye flour,
7:51 as much as will make a very thin batter.
7:54 We're going to stir this in, and then our mixture is done for now.
8:00 Now, we set it aside someplace not too hot and not too cold.
8:05 It It needs to be about, say, 72° if you can find that.
8:09 You can cover your bowl up with a cloth,
8:12 or you can even cover it up with plastic
8:15 if you want to make sure nothing gets in there.
8:18 This is going to set, and probably not do anything.
8:23 It will look completely dead for a couple of hours or even a day or two.
8:30 But, sooner or later,
8:32 it will start to show some little bubbles around the outside.
8:35 Maybe some larger bubbles and start to bring up some of this flour,
8:39 because it'll separate.
8:40 It'll have like a water on the top.
8:43 Sometimes I'll come in and just stir it, just to kind of keep it moving.
8:47 And when it starts to bubble, then we know that it is starting to work.
8:52 We can definitely maybe warm it up just a tad.
8:55 Don't get it past about 80° to see if you can get it a little more active.
9:00 Once we have that doing its thing, we can pour that in.
9:05 We can use that basically as our basis for making our bread dough.
9:09 We're going to do bread just like we normally would.
9:11 So, take about a half a pound of our bread flour.
9:15 We're going to put a little bit of salt on that.
9:17 We're going to make a little divot
9:18 in our flour and then pour in our yeast mixture.
9:22 Now, we're going to need a little bit of warm water off the side here,
9:25 uh because we probably won't have enough liquid.
9:28 But, let's stir that in and start to make our bread dough,
9:31 and add just a little bit of water until
9:33 we get to a nice soft bread dough consistency.
9:38 Now, here's the trick.
9:39 The The yeast, the wild yeast that we've just put in there,
9:42 it's very, very lowly active at this point.
9:45 It is not anything like a modern bread wheat yeast that we would use today.
9:50 It's going to take a long time for it to work through this lump of dough.
9:55 So, knead it well, and just like you did with our yeast mixture,
10:01 where we were capturing that yeast, we're going to set it aside someplace warm.
10:04 And it will likely take 8 hours, 12 hours, a day,
10:09 a day and a half before it really starts to look like it's growing.
10:13 We'll punch that down once, make it into our loaves, let it rise one more time,
10:18 and then put it in the oven
10:20 at our normal bread baking temperature of, let's say, 400°.
10:24 We're going to bake our pound loaf for 35 to 40 minutes,
10:28 and then it's ready to go.
10:29 As this was proofing, it kind of flattened out a little bit,
10:32 and I was worried it was going to be a real flat loaf,
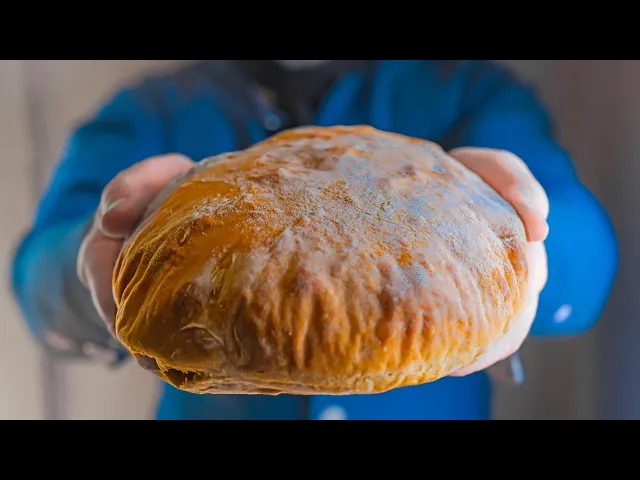
10:35 but in the oven it puffed right up, and it really grew a lot.
10:40 In fact, I didn't bother to split it over the top,
10:43 and you can see how it really uh has a life of its own here,
10:47 but we've got lots of wonderful formation here of the crumb.
10:53 It really turned out so much better than I expected.
10:57 It is fairly fine over most of it,
10:59 with some larger bubbles, but it smelled tremendous, it looks really good.
11:04 You would think, because this loaf really sat around
11:07 for quite a while waiting for it to kind of build,
11:10 more than 24 hours, um that it would be a sourdough,
11:14 that we could smell the sourness.
11:17 This does not smell sour at all.
11:20 So, we really didn't get to that state of fermentation,
11:23 even though it took a long time.
11:24 It's just because this wild yeast really hasn't had
11:29 a chance to grow so much that it became sour.
11:34 So, let's give it a taste.
11:36 This is brand new fresh bread.
11:47 Texture not perfect.
11:49 No real sourness to it all.
11:51 Again, kind of a fine texture.
11:53 It would probably do really well toasting it.
11:55 Now, we can and what we should do in a low flame this is
12:01 to save this save part of that dough for the next loaf we do.
12:05 That's the old leaven technique that was done over and over in the 18th century
12:09 by especially particular cultures and places like North
12:12 America would be a classic place to do that.
12:15 And then this this this strain of yeast and other things
12:19 going on here we kind of grow and get their own character.
12:22 This was quite an experiment for me trying to figure out how to get this done.
12:26 In fact, I was worried it just was not going to work.
12:29 But, the reality turns out it worked perfectly.
12:33 This was an experiment for me and you can
12:35 have fun doing the same kind of experiment for you.
12:38 What kind of yeast will you get?
12:41 What kind of loaf will you end up with?
12:43 Only you can find out.