Why Carne Guisada Is the Ultimate Weeknight Braise
Cook Well w/ Ethan Chlebowski
0:00 Hey, this dish is called carne gisada, and it's my first time ever making it.
0:05 Why exactly?
0:06 Well, in this series, I'm learning about and cooking four brazed dishes
0:10 from around the world that I've never made before.
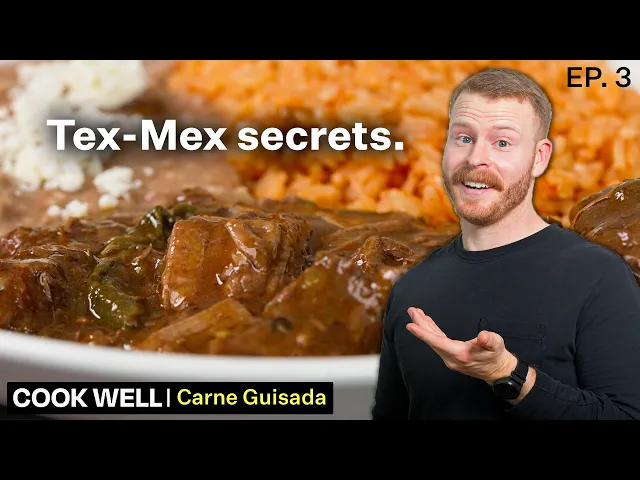
0:13 And for episode 3, we have a Texas and Mexican classic,
0:17 slow braised beef that is commonly served with beans and Mexican rice.
0:20 But the meat can also be used in tacos, quesadillas, or tostadas.
0:25 Now, for each dish in the series, I'm keeping track of two things.
0:29 First is the brazing framework, where I'll break down the cut used,
0:33 the brazy liquid, the key aromatics, and the form factor.
0:36 And secondly, I'm going to keep track of some home
0:38 cooking metrics like the number of ingredients used, the active time,
0:42 the brazing time, and I'm giving my personal
0:44 flavor ranking in a final taste test,
0:47 so we can compare and contrast throughout the series.
0:50 So to start, let's break down the brazing framework so we
0:53 can understand the secret to making great Carnegie sada at home.
1:00 First up, we've got the cut of meat.
1:02 And Carnegie sada is traditionally made
1:03 with tough connective tissue heavy cuts of beef.
1:07 And these cuts stay juicy over long cooking.
1:09 And more importantly,
1:10 all that connective tissue slowly turns from collagen into gelatin,
1:14 which improves the texture of the sauce.
1:16 And this is one of those dishes where looking
1:18 for a cheap cut of beef isn't a compromise.
1:21 It's kind of the whole point.
1:22 If we were making something like luro fun in episode two,
1:25 I'd steer you to look for pork belly specifically if you have it available.
1:29 But with Carnegie sada, my mentality is the complete opposite.
1:33 I would walk into the grocery store, see what's on sale,
1:36 see what looks like a good deal, and then build the dish around that.
1:39 So, I found a chuck roast on sale for $4.99 per pound.
1:43 And I also decided to pick up a pack of beef cheeks
1:46 that I'll show you how to trim up later in this video.
1:49 Next up is the brazing liquid.
1:51 And traditionally, the liquid here is pretty simple.
1:54 Usually, it's some fresh or canned tomatoes of some
1:56 sort that are then topped up with water or beeftock.
1:59 And the liquid is mostly there just to carry everything through the brace,
2:02 which is very different from the other dishes in episodes 1 and two.
2:06 For example, in Carbon Flam in episode 1, the beer is a major part of the dish.
2:11 It's where you get a lot of those signature aromomas and flavors.
2:15 Then in episode 2, the luro fun brazing
2:17 liquid is driven by light and dark soy sauces,
2:19 shaing wine, and sugar, which gives you that really distinct salty,
2:23 umami, and slightly sweet profile.
2:25 Carnegie sada, though, doesn't really work like that.
2:28 The liquid is simple on purpose, which is what makes the dish so flexible.
2:32 If you have beeftock, great, use it.
2:34 If not, water is totally fine.
2:36 If you have tomato sauce, throw some in.
2:38 But chopped tomatoes, canned tomatoes, tomato paste, all of it works.
2:42 And because the brazing liquid is pretty simple,
2:44 this means the aromatics and spices are where
2:47 you really define the personality of your carneada.
2:51 Now, if you look around at recipes online,
2:53 there are so many variations when it comes to the key aromatics.
2:57 But in general, the key ingredients tend to fall into two categories:
3:01 fresh aromatics and dried spices.
3:03 Fresh aromatics are things like the onions, bell pepper, celery,
3:07 and these are going to give you sweetness,
3:08 body, and kind of that slowcooked savory backbone.
3:11 Then you've got your dried spices.
3:13 These can be cumin, chili powder, black pepper, paprika,
3:16 a whole host of different spices or chili purees are out there.
3:20 There's really no single correct mix here.
3:22 I bet every family has their own little variations.
3:25 Now, for my fresh aromatics, I'm going to be using onions and bell pepper,
3:29 which are pretty common in many recipes.
3:31 But I'm also going to chuck in a couple of small
3:33 whole pablanos that are somehow still groy in my garden.
3:36 And this feels like the perfect use case for that.
3:38 Now, for the spice mix, I'm going to use cumin and chili powder.
3:41 And then I'm going to also add two
3:43 less common additions from the recipes that I saw,
3:45 which are smoked paprika and a little bit of coriander.
3:48 The smoked paprika is going to do two things for me here.
3:50 First, it's going to deepen that color a bit, and secondly,
3:53 add a subtle smoky note that I think
3:55 will really work well with a slow braise beat.
3:57 Then the coriander is just going to give
3:59 that kind of a tiny bit of background floral note.
4:02 It's not traditional for everyone, but that's kind of the point.
4:05 This part of the dish is very adjustable
4:07 and you should really make it how you want.
4:09 And I would love to hear from all of you
4:11 if you or someone in your family makes this dish.
4:14 Let me know what kinds of fresh aromatics and spices you typically use.
4:19 And finally, we've got the form factor.
4:21 And this is another reason that I love the flexibility of this dish.
4:25 If you're at a TMEX spot, especially in Texas,
4:27 Carnegiada usually sews up with reffried beans and Mexican rice,
4:31 but that's just one option.
4:33 The leftovers are great for spooning into tacos,
4:35 tortas, or using in quesadillas.
4:37 And this is why I'm going to make a really big batch
4:40 of this, so I can freeze the leftovers and pull them out for quick meals.
4:44 So, now that we understand the framework components,
4:46 let's see how long it takes to make my version,
4:48 and then I'll meet you back here for the final taste test.
4:54 [music] Okay, so let's cook.
4:58 And this might be one of the simpler preps of this series.
5:02 I'm just going to start chopping up these aromatics that I have first.
5:06 Then I'll go ahead and chop up the beef.
5:07 And I'm going to show you those beef cheeks in case you guys have never cooked
5:11 with them before because I think they're a really
5:13 um underrated cut if you can find them.
5:16 For both the peppers and onions here, I'm just going for a medium dice.
5:19 Nothing too precise is needed.
5:21 So, for the pepper, I'll cut the sides into four big pieces.
5:24 Then, also make sure to save that little nub in the middle and chop it up, too.
5:27 There's no reason to waste any of it.
5:29 Then, once I've got the flat pieces, I slice them across into planks.
5:33 Then, cut across again to get that medium dice.
5:36 And it's the same general idea with the onion.
5:39 I took half the onion, cut off the root and stem, peel it,
5:41 then made a few vertical cuts,
5:43 and just cutting straight across to finish the dice.
5:46 And in total, this took a minute and 30 seconds to get into the bowl.
5:50 Now, to finish out the vegetable prep,
5:51 I realized I was missing a can of tomato sauce for the liquid.
5:54 So, instead, I'm just chopping up some fresh tomatoes that I had on hand.
5:58 And I'll show this later, but once these cook down,
6:00 they end up forming a big part
6:01 of that saucy backbone along with some tomato paste.
6:04 And then, like I mentioned in the framework section,
6:06 I've also got a few small pablano peppers
6:09 that are somehow still growing throughout the winter.
6:11 It's Texas, so it hasn't been that cold.
6:13 So, I just remove the leaves and stems
6:15 from those, and we'll toss them into our braze hole.
6:17 And after another 90 seconds,
6:19 that brings our total vegetable prep to three minutes.
6:22 And now we're ready to prep the beef.
6:24 Okay, so I have my beef choices for this.
6:26 So chuck roast.
6:27 I've used this plenty of times.
6:28 And then beef cheek is an interesting cut.
6:30 And this looks like a lot of meat, but I do need to trim off a lot of this fat.
6:35 There's a ton of extra fat on this.
6:37 Um I'll keep the fat and kind of render it down probably for some beef tallow.
6:40 But as you guys will see when I cut into this beautiful
6:44 looking um cut of meat with tons of that interuscular fat in here.
6:48 For the beef, I start with the chuck roast.
6:50 They took it straight out of the packaging, then cut it into long strips,
6:54 then cut those in half and into smaller cubes.
6:57 And as I went, I kind of trimmed off some of the larger pieces of surface fat,
7:02 mostly because there's going to be plenty
7:03 of fat coming from the beef cheeks themselves.
7:06 And just for the chuck roast, that took about two and a half minutes
7:08 to get everything chopped and into a bowl.
7:10 And that's what I'm going to be counting as the official time.
7:13 I mean, even if you started with pre-shop stew meat, this would be even faster.
7:16 But the beef cheeks are going to take me a bit more work.
7:20 So, these beef cheeks are straight from the grocery store,
7:22 and they usually come in a vacuum
7:24 sealed pack like this because they're totally unprocessed,
7:27 which means there's a lot in here that we're going to trim away.
7:30 And I first heard about beef cheeks from Loy and Lewis,
7:32 which is a barbecue place in Austin.
7:34 and they've got this great video where they show how they trim,
7:37 season, and cook the cheeks whole before slicing them.
7:40 And ever since then, I'm always looking for a reason to use them.
7:44 So, I'm going to start by trimming them down into those bigger,
7:46 cleaner pieces like you'd see in their process.
7:49 But instead of leaving them whole,
7:50 I'm going to cut them into smaller size and shape to match the chuck roast.
7:55 And once you trim away a lot of that excess fat and connective tissue,
7:59 you really start to expose some of that good looking, wellarbled meat.
8:04 It's definitely not something you'd cook like in a steak,
8:06 but it's perfect for a long slow cooking dish
8:09 like carnegisada where all of that's going to break down.
8:12 And after transferring everything to the bowl, we are ready to cook.
8:16 Okay, so like I mentioned, the beef cheeks, there is quite a bit of just trim.
8:19 It's fat or like very cartilagy kind of connective tissue stuff that like
8:24 probably is not going to break down that well in the brace.
8:27 But I can cook this down, turn it into beef tallow,
8:29 or maybe I'll just cook it up and kind
8:31 of use it for Hopper's dog food this week.
8:33 Um, but as you can see, we got a ton of beef ready to go.
8:36 And now that we have the beef and the aromatics ready,
8:38 all we have to do is head back to the stove and start this braze.
8:43 Okay, so back at the stove, going to toss some oil down into the Dutch oven.
8:47 And then now we just have to cook everything up,
8:49 which really shouldn't take much more than maybe 10 or so minutes.
8:52 So, let's get into it.
8:54 Okay, so it doesn't really matter what order you go in.
8:56 I'm just going to toss in our onions and bell pepper
9:00 and then give these a little sweat down with some salt.
9:05 So, while the onions and peppers are sweating down,
9:08 I'm going to let them go for about 2 minutes.
9:10 I'm going to prep that spice mix we talked about.
9:12 So, I'm using one big spoonful of ground cumin seed,
9:15 a spoonful of ancho chili powder, a spoonful of smoked paprika,
9:19 which is going to give us a lot of really nice color.
9:21 Then, I'm adding just a little bit of crushed coriander.
9:24 Okay, so bell pepper and onions starting to smell great.
9:26 Now I'm going to toss in our little spice mix here.
9:30 Right into that oil to get those kind of mixture
9:33 of the fresh aromatics with the ones from the spices.
9:38 And this is really going to set kind of that aroma backbone for the carnegada.
9:44 To finish out the aromatic base,
9:46 I added the chopped tomatoes and then a big squirt of tomato paste.
9:49 Then as that cooks down and gets stirred together,
9:52 it starts forming that kind of rich saucy base.
9:54 And you can really tell how much flavor is going to be in that brace.
9:58 And I just let this mixture cook down for about 3 minutes or so.
10:01 Then once that's done, I pulled it out of the pot so we can brown the beef.
10:05 Okay, so I kind of got the aromatic mix ready.
10:07 Then I'm just going to toss in some more oil.
10:09 And it would be best to do this in batches
10:12 and kind of get a ton of browning on there.
10:14 I'm feeling lazy today.
10:15 I'm just going to throw everything in all at once and we'll get at least
10:18 the bottom brown and then just kind of mix it up and get it in the oven.
10:22 So, I just added all that beef to the pot on high heat.
10:25 And this is probably going to take a good 6 to 8 minutes to really brown up.
10:29 But this is a great window to clean as you go.
10:32 So, while the beef is cooking, I'm going to do the dishes,
10:35 put away the ingredients, and just kind of wipe things down.
10:38 I washed the wooden cutting board with some soap and water, set that out to dry.
10:41 Then I put away my spices, cleaned up the bowl that the beef was
10:44 in, and anything else that I was done using.
10:48 Okay.
10:48 So then to finish this out,
10:49 I'm just going to toss our kind of aromatic tomato saucy mix back in.
10:56 That's going to really bring all those beautiful aromomas to pair with the beef.
11:02 Then I'm going to also toss in just one bay leaf.
11:07 And then the last thing we got to do
11:08 is just top this up with beefto or some water.
11:19 Okay, then my last little addition.
11:20 These are just some they're pablanos actually um from my garden.
11:25 Figured why not chuck them in here.
11:27 Um I'll just chuck them in whole.
11:29 I think it'll be a nice little snack to kind of have once everything cooks down.
11:32 But now we're ready to let this sit low and slow.
11:36 So once everything else is added,
11:38 it only needs another 2 minutes or so in the pot.
11:41 And as you can see, this is a pretty quick braze to get set up,
11:44 even with all the chopping.
11:45 So from here, it goes into the oven to cook low and slow.
11:48 And I like using the oven for braces.
11:50 It's just easy, hands off.
11:51 You don't need to babysit the stove.
11:53 So I let it go with the lid
11:54 on for the first hour to bring everything up to temp.
11:58 But as you can see, it's still pretty pale at this stage.
12:01 So I like taking off the lid for the next 2 to 3 hours.
12:04 And this is key because the uncovered
12:06 time lets some of that excess moisture evaporate
12:09 and it's going to give us some deeper color on theos and the rest of the braise.
12:14 And after another 2 hours, you can really start to see that fat
12:17 separating on top and everything bubbling up.
12:19 It looks incredible.
12:21 Now, to finish this off,
12:22 the sauce is usually thickened with some flour that maybe you added to the beef.
12:26 But instead, I bring it back to the stove.
12:28 And first, I'm going to skim off the excess fat using
12:30 a paper towel since there's quite a bit sitting on top.
12:34 And to thicken this, I made a slurry with some cornstarch
12:36 and water and then just poured that directly into the bowl.
12:40 And bring this up to kind of a simmer until the sauce
12:42 starts to coat the meat the way I want it to.
12:45 And at this point, the carneisada is done.
12:47 You can see that sauce really clinging to the beef now.
12:50 But I actually waited until the next day to finish so we can eat this.
12:57 Okay, so it is the next day now.
12:59 But that is another great thing about braces.
13:01 You can really just leave it off and then just pop
13:03 it on the stove the next day and we're ready to go.
13:06 Now, there are plenty of ways you could serve
13:07 this, but I'm going to go kind of the classic
13:09 Texmex kind of uh restaurant style and we're
13:12 going to make some Mexican rice and reffried beans.
13:15 For the Mexican rice,
13:16 I'm following a technique I learned from one of Diana Kennedy's books.
13:19 So, I start by pouring some rice into a container.
13:21 Then, I prep a quick vegetable mixture.
13:24 Tomatoes, onion, and then a clove or two of garlic
13:26 are all going to go into a blender and get pureeed.
13:28 And this is what we'll add to the rice later on.
13:31 Now, what's interesting about this method is that you start by kind
13:33 of shallow frying the rice in a decent amount of oil.
13:36 You want to see it bubbling in the oil and even develop a little bit of color.
13:40 So, you should see some light browning on the grains.
13:43 After about 4 minutes, once that rice is toasted, you then add in that tomato,
13:47 onion, and garlic puree and let that fry off a bit as well.
13:51 Then, to finish it off, all you do is add in salt and about 1.25 parts of water.
13:56 Bring it to a boil.
13:57 And then once you kind of start
13:58 seeing these little holes forming on the surface,
14:01 turn the heat all the way down to low, cover the pot with a towel,
14:04 put the lid on, and then let it steam for about 15 minutes.
14:07 And that's it.
14:08 You end up with this really beautiful, flavorful Mexican rice.
14:12 Make sure to taste it and add some salt at the end if needed.
14:15 And what's great is while that's steaming, we can actually do the beans, too.
14:18 So for the beans, this is my standard quick reffried bean method.
14:22 And since I already had the blender out,
14:23 I just threw those pinto beans in there and blended them into a puree.
14:27 Then back of the stove, I added a clove of sliced garlic,
14:29 a small sprinkle of cumin seeds, and a little bit of vegetable bullion,
14:32 which I like for that salty and kind of roasty flavor.
14:35 Then I pour in the pureed beans,
14:37 let them come up to a simmer, and finish them with salt.
14:41 That's it.
14:41 Super simple.
14:42 So at this point, we've got all the main components ready.
14:45 The carnegiada, the Mexican rice, and the reffried beans.
14:48 So let's plate it up.
14:50 I start with a good serving of that Mexican rice.
14:52 Then follow that with the reffried beans.
14:54 Then add a couple of generous ladlefuls of that carneisada.
14:58 And to finish, I added a little queso fresco
15:00 over the beans and some pickled onions on the rice.
15:03 And that's it.
15:04 We have a really beautiful looking plate here.
15:07 Okay, so before we get into the taste test,
15:09 let's take a quick look at the cooking metrics.
15:11 So prep time was about 21 minutes to get everything into the oven.
15:15 Then from there, it needed roughly 3 or so hours of brazing.
15:19 though you could go longer if you want.
15:20 And ingredient-wise, we're looking at around 12 to 13 ingredients,
15:23 but most of these are really pantry and fridge staples.
15:26 So, carnegisada is a pretty convenient dish [music] to make at home.
15:30 But with that said, let's see how it tastes.
15:33 First meal of the day, I am excited to dive in.
15:35 Looks really beautiful as well.
15:37 Just the glossy beef, the rice, the beans.
15:41 Also, I crisp up a little flour tortilla just
15:43 on the gas burner to kind of use to scoop some up.
15:47 So, let's get into this.
15:58 Make a little bite with the beans, the rice, pickled onion.
16:05 That's about to be a good bite.
16:10 Okay, so very satisfying meal.
16:12 I love like the beans, the rice, the beef,
16:14 being able to kind of make your own little bites as you go.
16:18 As far as the flavor ranking goes, I'm going to give this one an 8.1,
16:22 which is lower than the other two episodes.
16:24 But I think what's interesting is there's a much higher degree that I would make
16:29 this again before the other two just
16:31 because Carnegieada just feels very versatile to me.
16:36 Like it's not super super strong like a chili conc carne or something like that.
16:41 So, it really works across a number of applications.
16:44 So, after I finish this meal,
16:46 I'm going to, like I said, I'm going to freeze the leftovers.
16:48 I'm also just going to keep some in the fridge.
16:49 I'm excited to make some tacos, some quesadillas,
16:53 um maybe some tostadas and things like that.
16:54 And I think that's really where the secret to like carneasada is,
16:58 is its flexibility, its versatility.
17:01 But anyway, that is going to wrap it up for me in this one.
17:04 As always, if you guys want to follow this exactly,
17:06 we'll have a recipe linked down below.
17:08 But hopefully you see really this is a versatile
17:10 dish that can be made in a number
17:12 of ways and you can really control kind of what personality you want to give it.
17:16 So that's going to wrap it up for me in this one.
17:17 I will catch you all in the next one.
17:19 Peace y'all.